
Let’s roll crits in Kill Team!
Greetings and welcome to my product review of Warhammer 40,000 Kill Team Octarius. Before I get into things, thanks to Games Workshop for providing this to review for free. Still, as always I am to be impartial, honest and constructively critical. Without further ado, let’s get on with the review!
I’ve also done this review as a YouTube video which you can check out below:
What is Kill Team?

Kill Team is basically the skirmish version of Warhammer 40,000. It allows for faster and smaller format games without needing the larger time and invest of normal games of Warhammer 40,000. The game focuses on 2 players duking it out with their own kill teams in secret missions as both fight for victory. The great thing is how games of Kill Team can be separate stealth operations to the main game or used to tie into the story of normal/bigger games of Warhammer 40,000 where the victor of the Kill Team game can set the stage for the 40k game.
Even with this neat narrative focus, Kill Team allows for competitive games along with its more narrative-focused ones. As such it helps appeal to players of both aspects while still being a good stand alone game on its own. Although I’ll cover different ways to play later on.
What’s in the Box?

This box is the debut of the new edition of Kill Team, technically making it the 2nd edition of the game since it got its own dedicated rules set around 2 to 3 years ago. Inside you get: the Death Korps of Kreig kill team, Ork Kommandos kill team, 5 sprues for terrain, templates and barricades, dice, the Kill Team core book, the Octarius book, 2 sets of identical Tac Op cards, a double-sided token card sheet and instructions for how to build everything.
While I lack the knowledge on price, that is still a lot of stuff you get! The Kill Team Octarius box contains everything you need to play with the 2 kill teams provided in the box, which is an important caveat. You still get the full core book for Kill Team, covering all the rules for the game, as well as dice and measuring gauges. The terrain is also really nice, simple to build and designed around the core rules and mechanics of the game. As I said, the main downside is lack of rules for other kill teams which are locked away in the Kill Team Compendium book. Although this is more important matter if you’re not interested in using the 2 included kill teams.
The Narrative
In the books provided, they describe the current state of the Warhammer 40,000 universe where there is only war and the warzone Octarius. The core book covers why and how kill teams are used in the Warhammer 40,000 universe, from their roles to notable historic kill teams and their operations. Kill teams are shown how they fit in with the larger Warhammer 40,000 armies and each major factions’ kill teams are exemplified too. This is still refreshing and informative for players both new and old to the Warhammer 40,000 universe.

As for warzone Octarius, this represents the Octarius Sector of space where the current Kill Team box is set and named after. The Octarius Sector is a huge warring sector of the Warhammer 40,000 universe where the Orks and Tyranids have been fighting it out together after the Tyranids were lured into, ideally, mutually destroying the Ork menace by Inquisitor Kryptman. Unfortunately, both races have benefited greatly from the endless combat and now forces from both sides threaten to break out of the sector and spread out into the surrounding sectors. In order to contain these threats, kill teams have been dispatched to key conflicts to prevent this and to allow Imperial forces breathing room to commit strikes of attack from.
The Rules
In the core book, the core rules take up pages 50 to 81 (so 31 pages for core rules) and then page 82 and onwards cover more advance rules, with the book being 144 pages in total. The first few pages cover core concepts such as operative datacards, modifiers, engagement range, rolling dice and so on.

The biggest thing that takes awhile for your head to get around are the shapes. While standardised ranges are great, the symbols use are confusing at first and take a while to get used to. This is because a triangle is 1”, a circle is 2”, a square is 3” and a pentagon is 6”. If Games Workshop used different shapes (for example, a hexagon as 6”) then it wouldn’t hurt so much to say and read. It does get a lot better once you’ve read the rules more and played a few games, but yeah.
Battle Structure

Games of Kill Team follow a standard Battle Structure. Turning Points as basically renamed turns. At the start of every Turning Point you have 3 phases: the initiative phase, then strategy phase and finally firefight phase. Each game of Kill Team has 4 Turning Points and then after that you total up the total victory points (VP) to determine who has won.
Initiative Phase
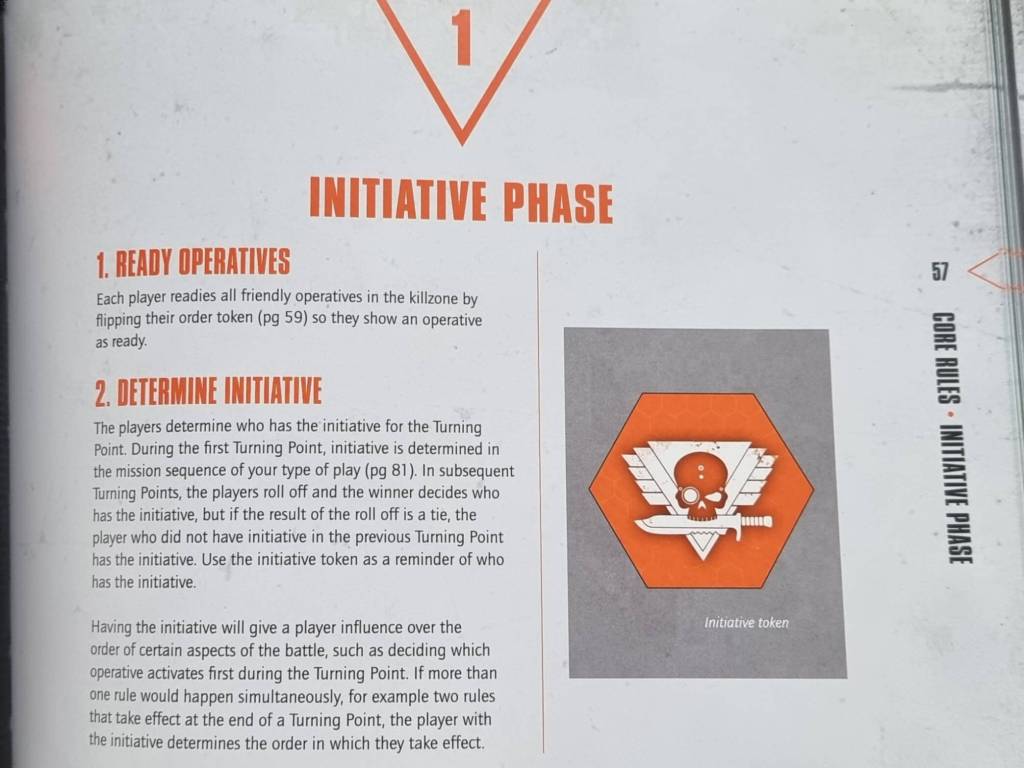

The initiative phase is where each player readies their operatives (models). You give each fighter either a conceal or engage ready order and token. Engage order allows operatives to make any action freely at the cost of being shot at. Conceal order represents being stealthy, limiting what actions you can take (such as not being able to shoot while concealed) with the benefit of being un-targetable by shooting attacks while within range of terrain. There are exceptions to these limitations but those are usually stated under abilities and special rules.
After readying operatives, you then determine initiative. During the first Turning Point, this is determined by whatever mission sequence you are playing, otherwise it is a roll-off. If it is a tie, the person who DID NOT have initiative in the last Turning Point gains initiative. This allows for some interesting swings in momentum and limits a single player having dominance. You also have a initiative token you can use to show who has the initiative.
Strategy Phase
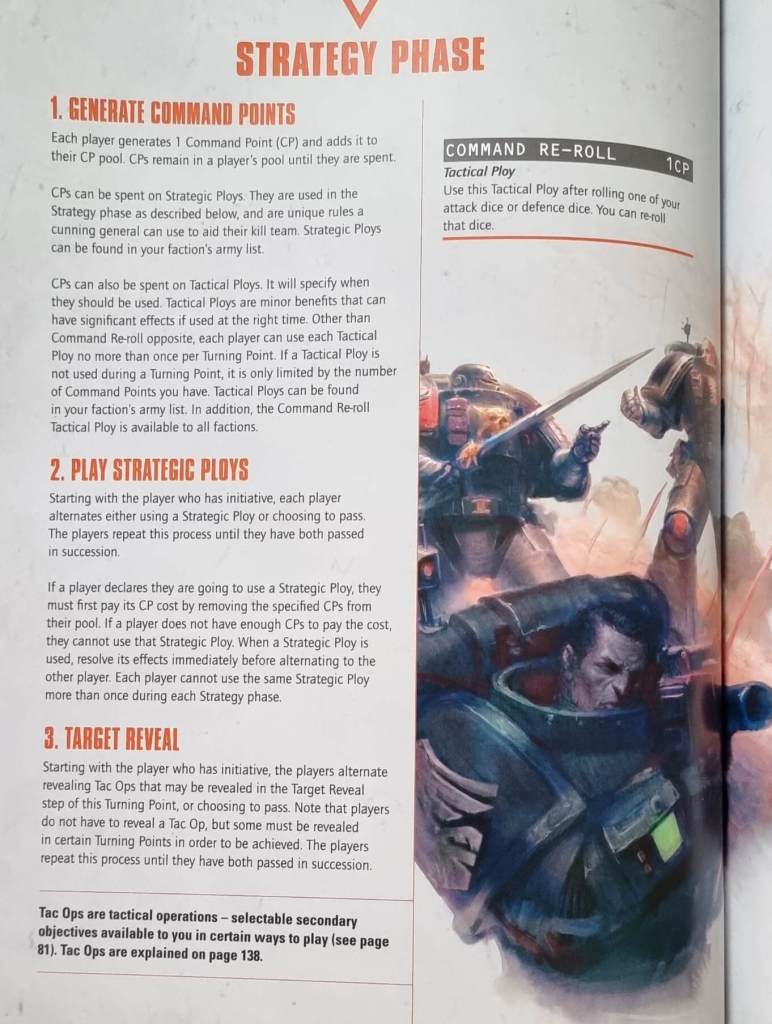
During the strategy phase you generate command points (CP) at step 1. If you have a leader at the start of the game you get 2 CP. You also generate 1 CP at the start of each other turning point. These are cumulative and are not lost if you do not spend them. You use command points to play strategic and command ploys. For example, everyone has access to the Command Re-Roll for 1 CP.
Step 2 is play strategic ploys. Whereas command ploys can be played during the firefight phase, this is the only instance where strategic ploys can be played. Each player takes it in turns to do so until both players have passed in succession, starting with whoever has initiative.
Finally you have the target reveal step. Once again, starting with whoever has initiative you take it in turns revealing any Tac Ops you have. These are optional to reveal unless the Tac Op specifies that it has to be revealed that Turning Point. Tac Ops are basically your secondary missions and will be explained fully later.
Firefight Phase
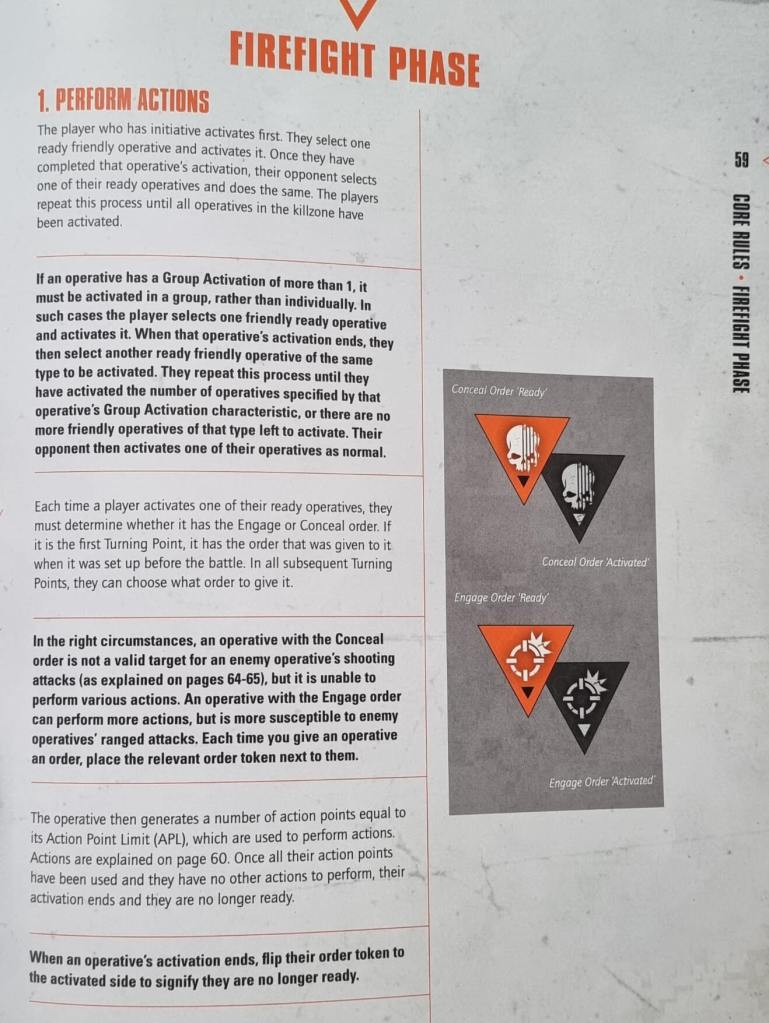
The firefight phase is the main phase of the game. This phase allows you to alternate activating operatives starting with whoever has initiative. Each operative can carry out a number of actions based upon their action point limit (APL). Actions cannot be repeated more than once unless specified so you can’t repeatedly take the shoot action for example. Once an operative has used up all their APL, they go from ready to activated and flip over their token to denote this.
If an operative has a group activation (GA) of more than 1, then they must be activated in groups. For example, 2 operatives with a GA of 2 must be activated together, with the second operative being activated after the first operative has been activated.
Actions

As for actions, they are broken up into 4 categories: universal actions, unique actions, mission actions and free actions. You have a variety of actions an operative can perform as shown above. These are only limited by your operatives APL or unless otherwise stated in the action as some do clash such as not being able to do both the charge and normal move actions together.
Shooting and Fighting
When it comes to shooting and fighting, the important thing to remember is here that rolls of 6s are criticals, or CRITS for short. Crits are the best, love crits, I am crits. Crits will be explained in a bit but you have critical success then normal successes which are any dice that match or beat your normal WS/BS value.

Shooting works by rolling a number of dice based on the weapon’s attack value then comparing the results to the WS/BS value as long as you have a valid target in range. Remember, that all weapons have unlimited range unless specified in the weapon’s special rules. After that, your opponent rolls their defence dice based on their defence (DF) value and can automatically remove 1 dice to count as a successful normal save if they are in cover. Then you resolve hits.
Starting with the defender, they can use a normal save to negate a normal hit, 2 normal hits to negate a crit, or a crit to negate a crit or a single normal save. Sadly a crit cannot negate 2 normal hits. The attacker then resolves whatever dice are left, dealing damage based on the value of each dice role to the defender. After all attacks are resolved, remove the defending operative if it is incapacitated.
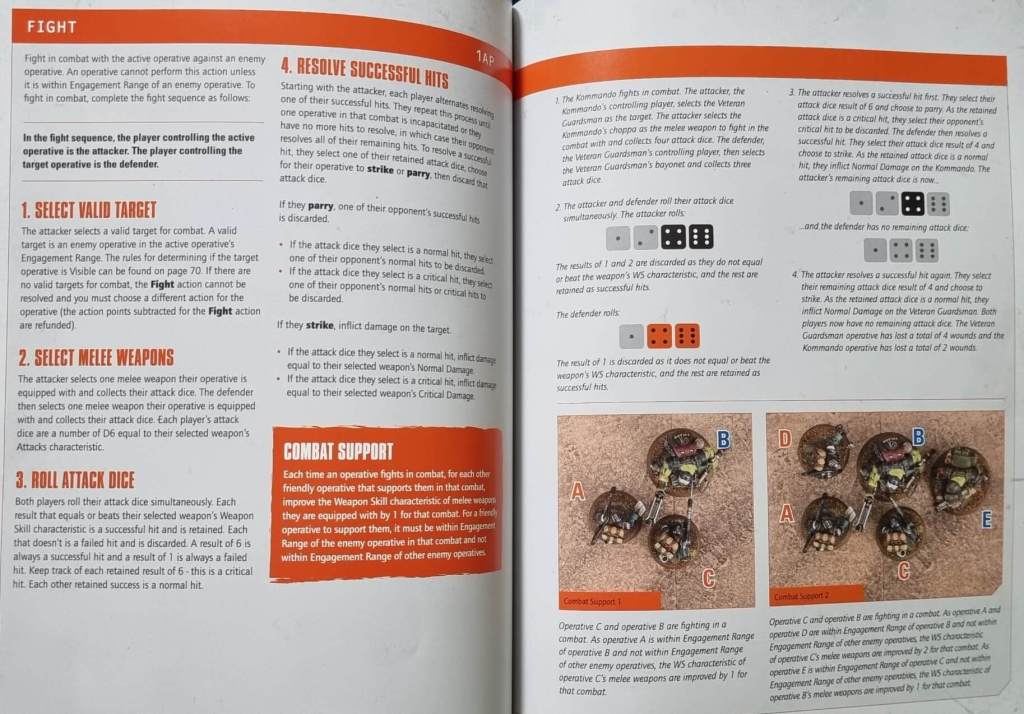
Fighting works a bit differently than shooting. It still follows selecting targets and weapons as shooting, but both player roll their attack dice each after choosing a melee weapon to attack with. Starting with the attacker, each player has the option to strike or parry. You get no armour or invulnerable saves. If you parry, you can discard an opponent’s normal success with one of your own normal successes or discard one of their crits with your own crits. If you strike, you instead do damage based on whether you had a normal success or a crit. Your opponent then decides whether to strike or parry themselves. This is repeated until an operative is dead or there are no more successes.
You also have combat support where an operative gets +1 to hit for each other friendly operative that supports them. An operative provides support if they are within engagement range. Whoever has the most supports gets the +1 to hit based on the difference of supporting operatives.

An operative has a wounds value of W. When your W is 0, you are incapacitated and removed from the battlefield. If you have fewer than half its wounds, your operative is injured. An injured operative removes 1 circle (2”) from its movement value and gets -1 from it WS/BS values.
Overall, shooting is strong but fighting is truly deadly. Because it ignores saves and the attacker gets priority, you can use fighting to guarantee kills on wounded operatives and ignore high saves as well as invulnerable saves. Never leave home without at least 1 close combat specialist!
Objectives
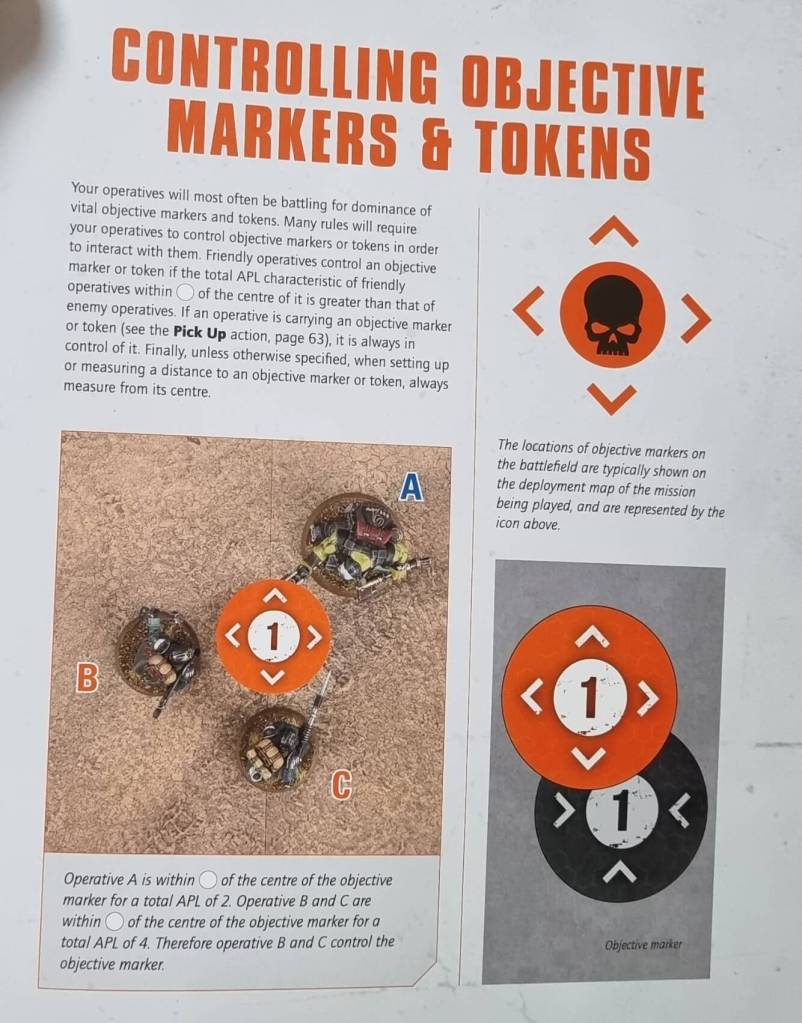
Objectives are you main way to get victory points to win missions in games of Kill Team. They use a 40mm objective marker in the box but you control an objective via measuring a circle (2”) range bubble from the centre of the objective marker. Whoever has the highest APL of total combined operatives within range controls an objective.
You can also redeploy and move certain objectives with the Pick Up action. An objective marker carried by an operative is always in control of it until they are incapacitated. Note only certain missions allow you to Pick Up and move objective markers.
Line of Sight

When measuring line of sight, you do so by drawing an imaginary line from the operative’s head to any part of the miniature that is the target, apart from its base. The image above helps show when a fighter is in line of sight if it has the engage or conceal order.
An operative is obscured when they are more than circle (2”) from a point at which the line crosses an obscuring terrain feature. However, if that operative is within triangle (1”) of the terrain feature it is not obscured but in cover instead.
An operative is in cover when they are more than circle (2”) from your operative and within triangle (1”) of a cover line that crosses an operative’s base or terrain feature that provides cover. Cover is a cone starting from any part of your operative’s base to the edges of the target operative’s base.
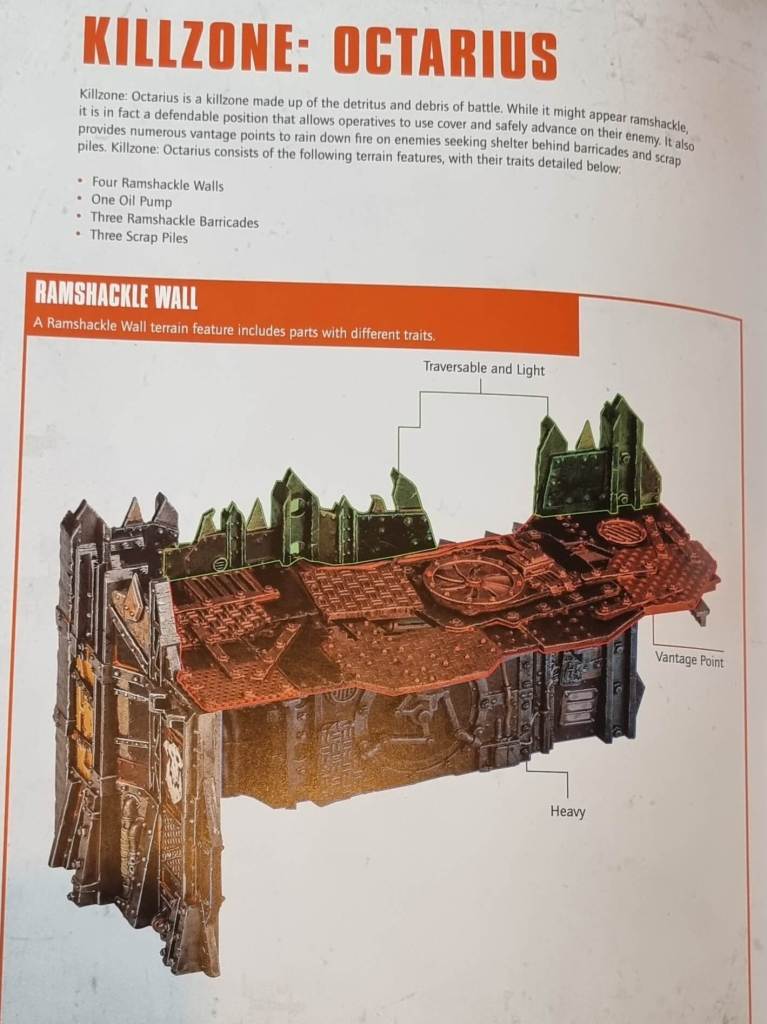
Terrain

Terrain is a huge part of Kill Team and the Octarius box comes with several pieces of it. Terrain also has the following traits: heavy, light, traversable, insignificant, barricades and then vantage points. These traits are decided by players at the start of a game like in Warhammer 40,000 so you all agree on what the terrain does.

Vantage points basically give you shooting positions from terrain. Moving through terrain, climbing it and jumping over it all cost movement points with climbing being the most limiting as you need at least a spare circle (2”) of movement to move onto the level reached. This basically means you cannot move 6” straight up a wall as you would lack movement to then fully move onto the terrain piece.


The book also goes over example boards, with good and bad terrain layout examples, as well as how to classify terrain. They show that a singular terrain piece can have multiple terrain traits based on its size and construction.
Play Formats
For play formats, you have 3 ways to play. These are: open play, narrative play and matched play. Each play format has its own mission sequence to follow which I’ll cover below.
Open Play

Open play is basically casual mode. Great for pick-up play and intro games. Pretty simple with little restrictions on how you want to play. It has a singular mission which is found within the core book.
Narrative Play
Here is the narrative play mission sequence.

Narrative play are comprised of Spec Ops campaigns. In a Spec Ops campaign, you assign battle honours (roles) based on your operative’s data card which are categorised between combat, staunch, marksman and scout. You gain experience and skills as you play through a Spec Ops campaign based on how well your operatives perform and you can even lose them permanently if they die and you roll badly on the injury table. You also have a base of operations to work from and can requisition skills and items as the Spec Ops campaign progresses.


Spec Op campaigns basically follow the old rules from the previous Kill Team edition. The specialisations and items are how kill teams used to be constructed. It is more in-depth than matched play but it leads to a really fun and rewarding narrative campaigns as long as you are able to invest the time into playing a Spec Ops campaign.
Matched Play

Matched Play is the way to play Kill Team competitively. First you have your roster of your faction made up of 20 operatives. From this roster you construct your fire teams and kill team to play a mission with. Constructing a kill team is covered separately in-depth within the Kill Team Compendium Book.
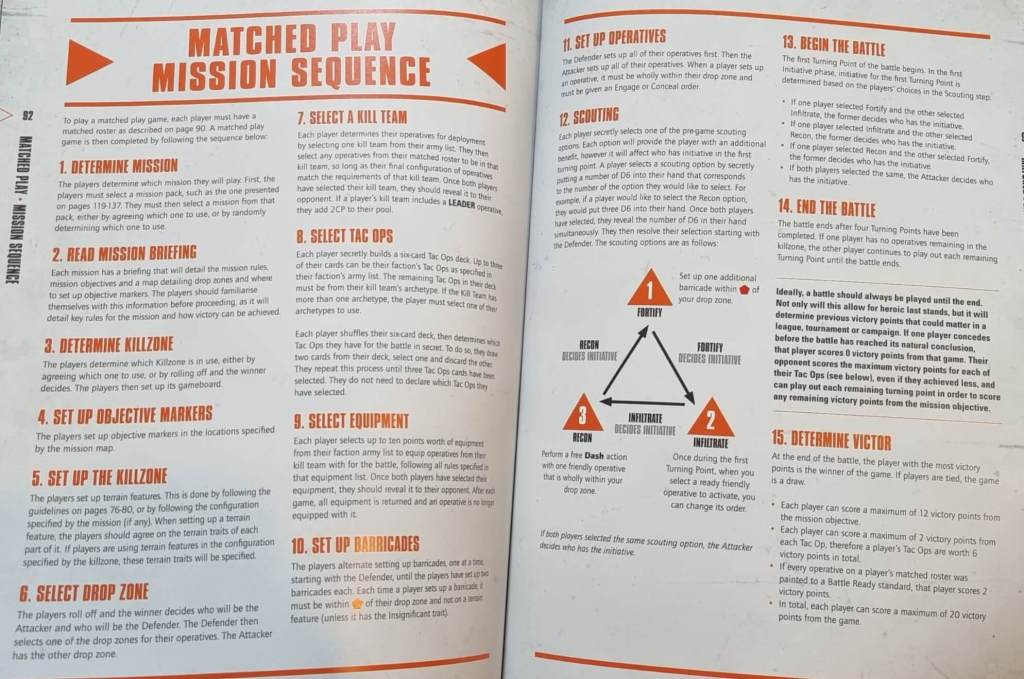
Once you have a matched roster, you follow the matched play mission sequence. While it does have a lot of steps, the sequence is clear and easy to follow. You follow the steps then begin playing.
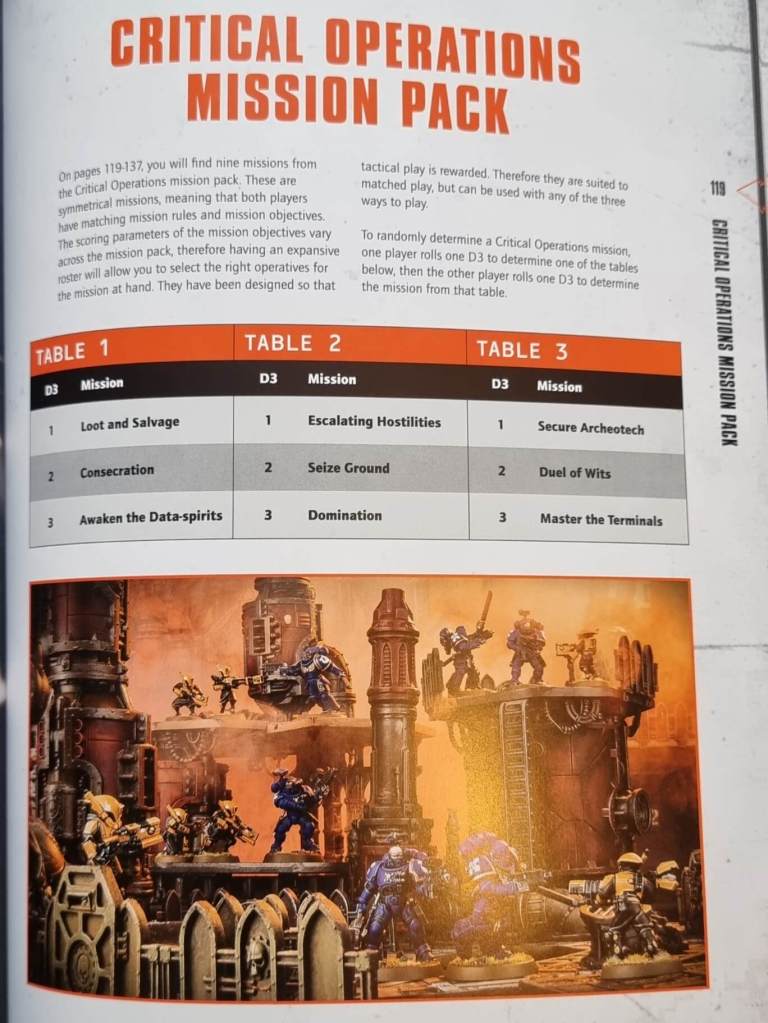
For matched play you use the critical operations mission pack. These 9 missions are determined via rolling a D3 to determine which table to roll on (either table 1, table 2 or table 3) and then another D3 for which mission will be used. Each mission is very varied and feels mostly balanced, with a focus on management of the objectives with scoring based off of completing mission objectives
Tac Ops
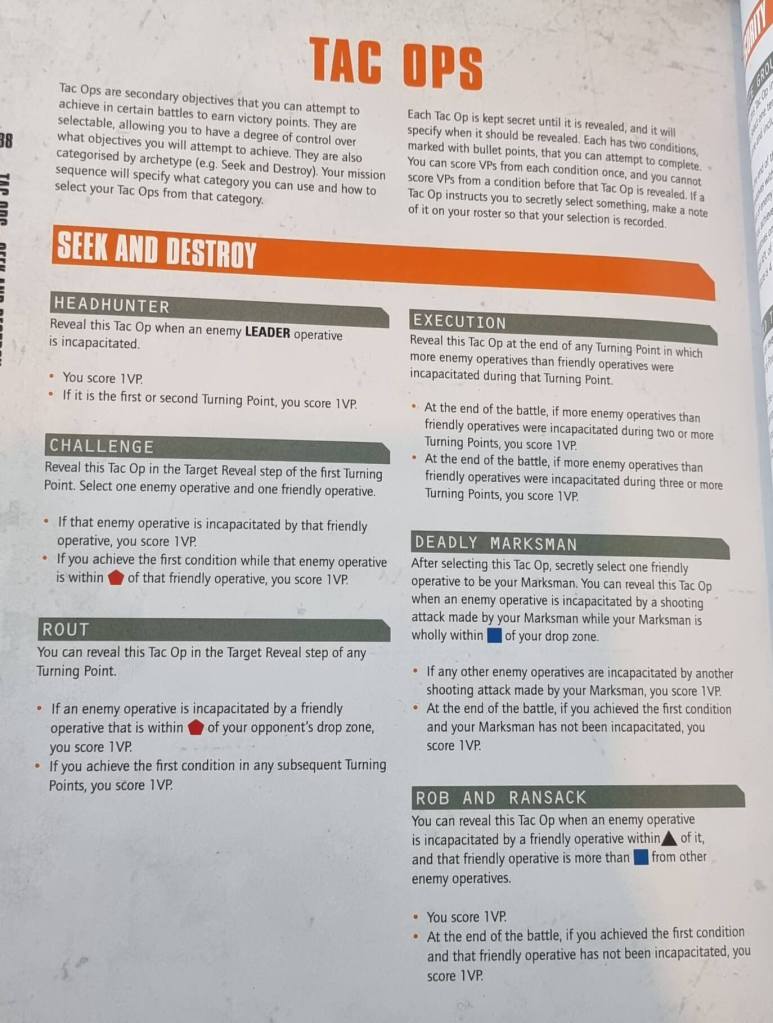
Tac Ops are a big part of Kill Team as they provide you additional missions to complete to score more VP. These are basically your secondary missions. You select a Tac Ops category based on your Kill Team’s archetype. Note, a kill team can have multiple archetypes but you can only include Tac Ops from a single archetype. These are: Seek and Destroy, Security, Infiltration, Recon. Newer factions also come with 3 faction Tac Ops that you can select instead, with each replacing a single Tac Op from the archetype you have selected.
As shown in the matched play mission sequence, at step 8, you will now have a deck of 6 Tac Op cards. You draw 2, discarding 1. You repeat this 2 more times until you have 3 secret Tac Ops which you reveal as stated by the card or during the strategy phase. Thankfully, the Kill Team Octarius box comes with 2 identical Tac Op card decks so both players can select their own Tac Ops with ease, including 3 blank faction Tac Op cards for every faction.
Appendix
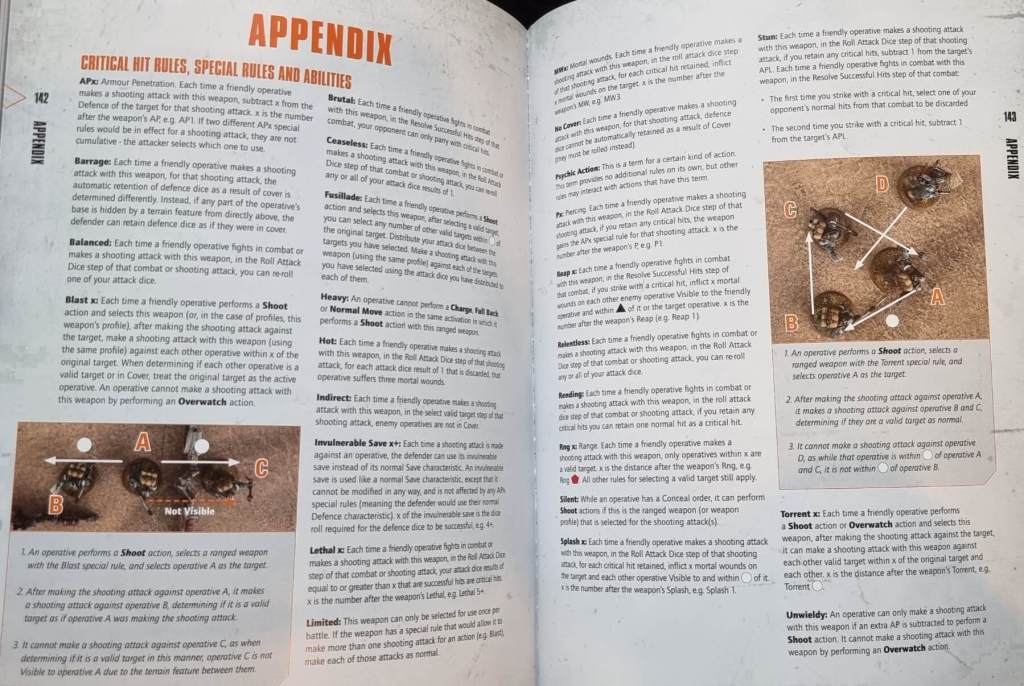
Finally you have the appendix. This covers all the special rules for every shooting and close combat weapon in the game. It is clear, mostly, and at the back of the book. Would have been nice to be included as a separate reference sheet too but yeah. The heavy trait is the only slightly unclear wording as it states you cannot move or charge after performing an attack with a heavy weapon but doesn’t state you can move then shoot (as you choose the order actions are resolved 1 at a time). The intention is clear but just needs some clarifying.
Octarius Book

For the 2nd book in the Kill Team Octarius box, you get the Octarius Book which covers the narrative, kill teams and missions for Octarius. For a campaign book/supplement, it does cover a lot of things with a surprising level of depth too. You get an in-depth explanation of the Octarius sector and how everything is going currently. The book covers a deeper focus on the Astra Militarum and Ork forces, including details such as names, historic kill teams and lore.


For rules outside of the included kill teams, you get 9 specific missions based on the Octarius sector. These are designed for Spec Ops campaigns and add excellent narrative focus along with detailed deployment maps using the provided terrain. The Octarius book even lists and categorises all the specific terrain found with the Kill Team Octarius box. As an extra touch, you even get narrative-themed datacards for your Kreig and Ork operatives, with accurate Orky touches for the Xenos brutes.
Overall, the Octarius Book is a great thing. It introduces new rules and kill teams in ways that make sense while still heavily tying them to the narrative of the setting. The focus on narrative is especially nice as that is something which has been heavily missing from recent Warhammer 40k codexes. Even then, the Octarius Book is a great way to play the contents of the Kill Team Octarius box as the narrative missions allow for a balanced and thematic natural gameplay progression. If this is how Kill Team plans to add new kill teams, then it’s definitely a good sign.
Death Korps of Krieg

Within the Octarius Book, you get dedicated and detailed rules for the new kill teams. First up are the Death Korps of Krieg. The Octarius Book shows how you can build a Krieg kill team along with all their rules.
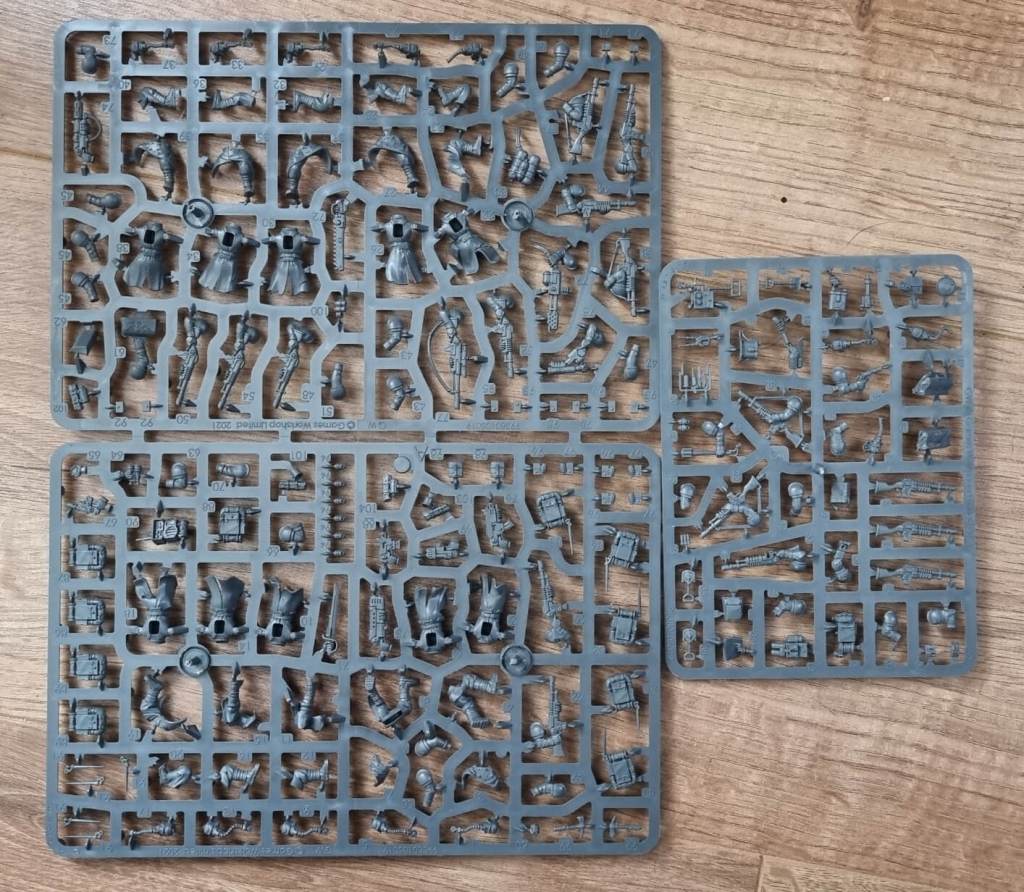
The sprues are packed with detail. Everything is fairly straightforward to build, although it is still complex for a Games Workshop kit. I rate the Death Korps similar to a Necromunda kit in terms of build difficulty. You get a lot of amazing options, with my favourite being the spotter with the pocket watch option. Bodies and heads can’t be swapped, which makes sense, but arms have a bit more freedom.
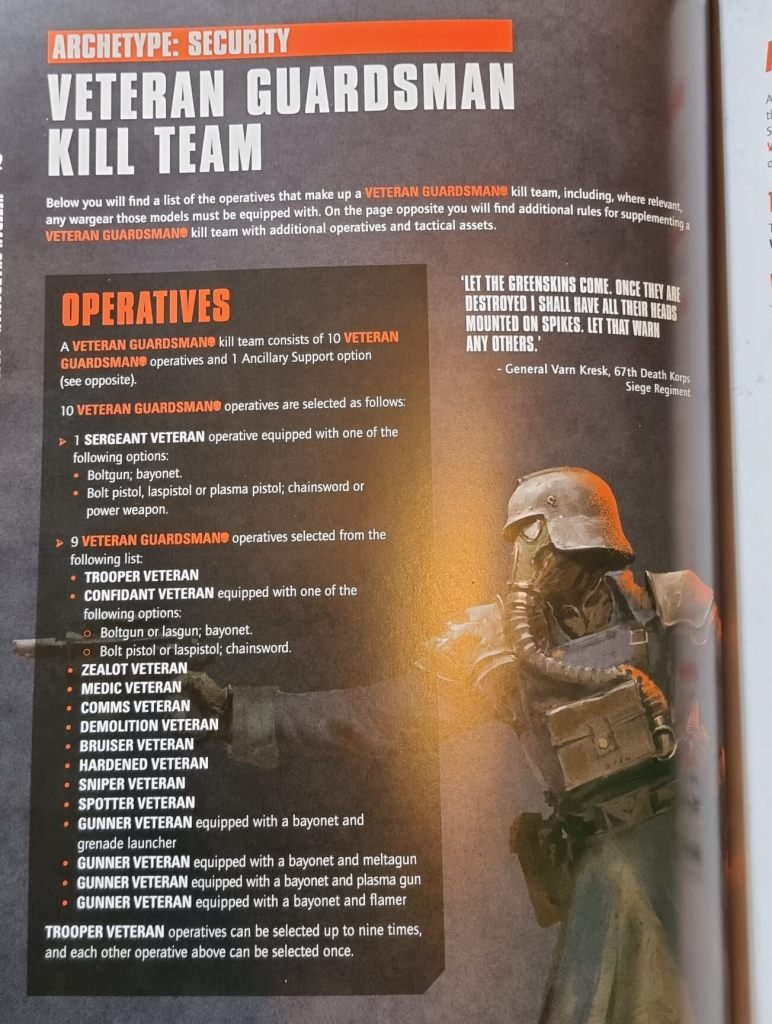
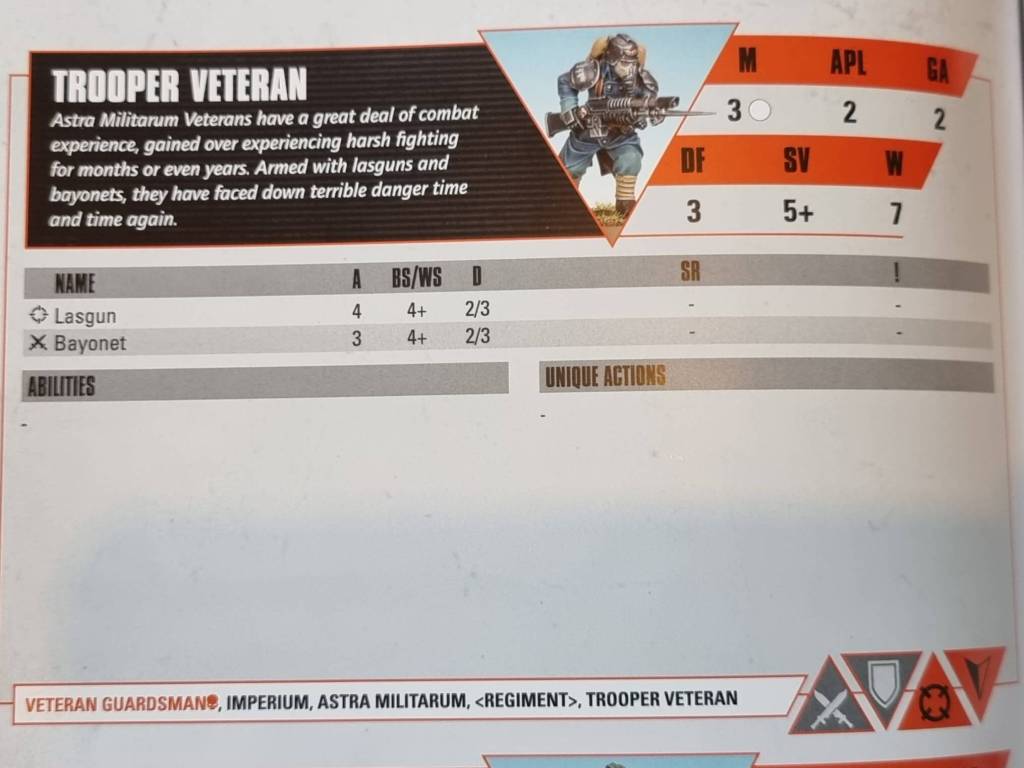
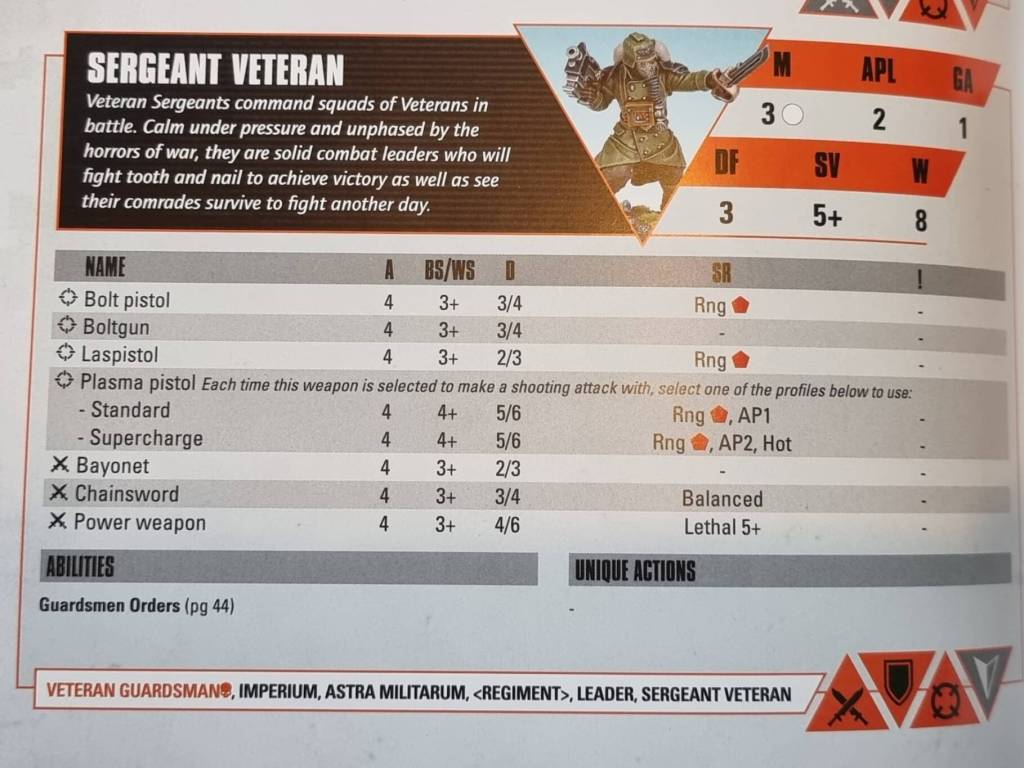
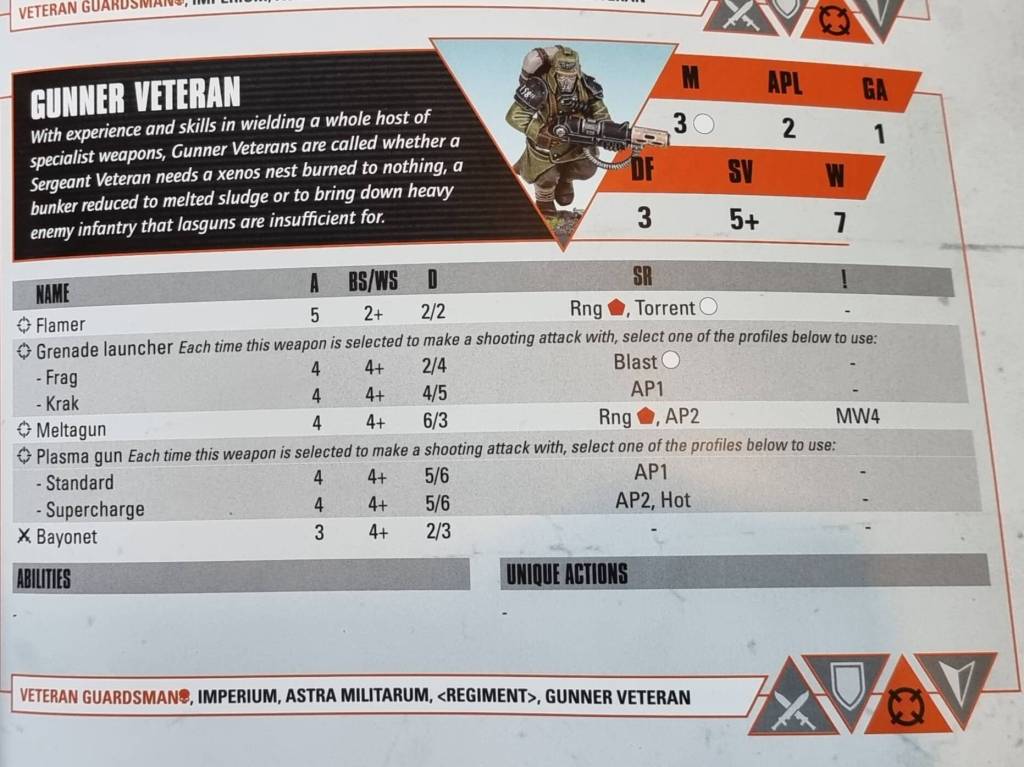
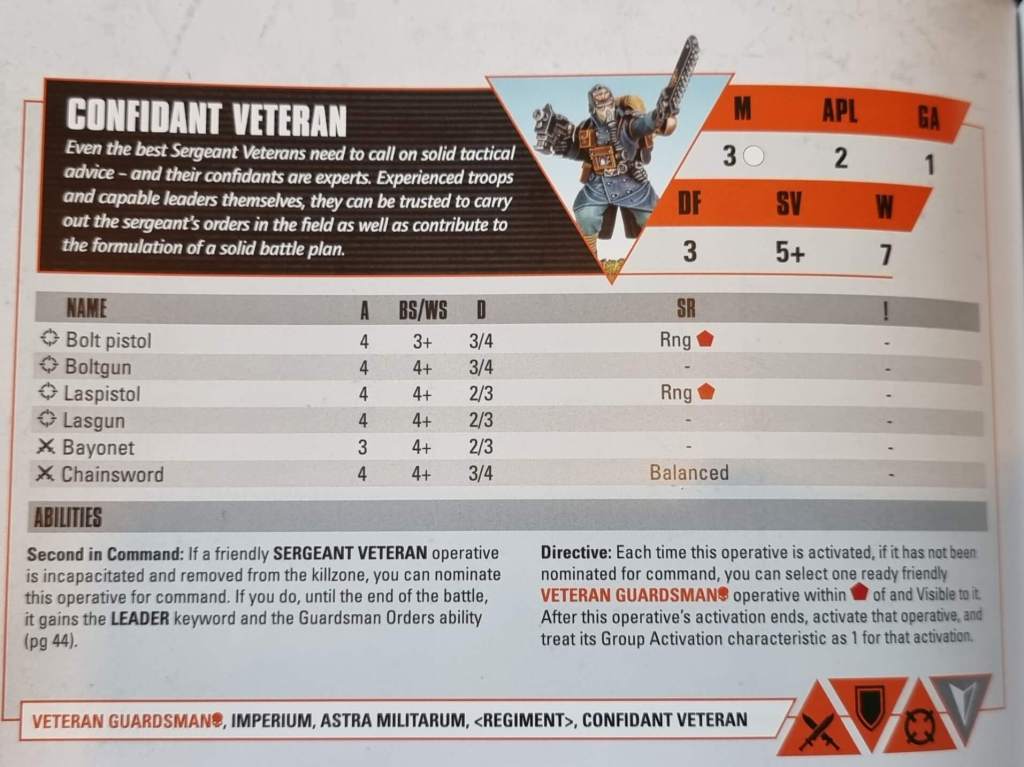
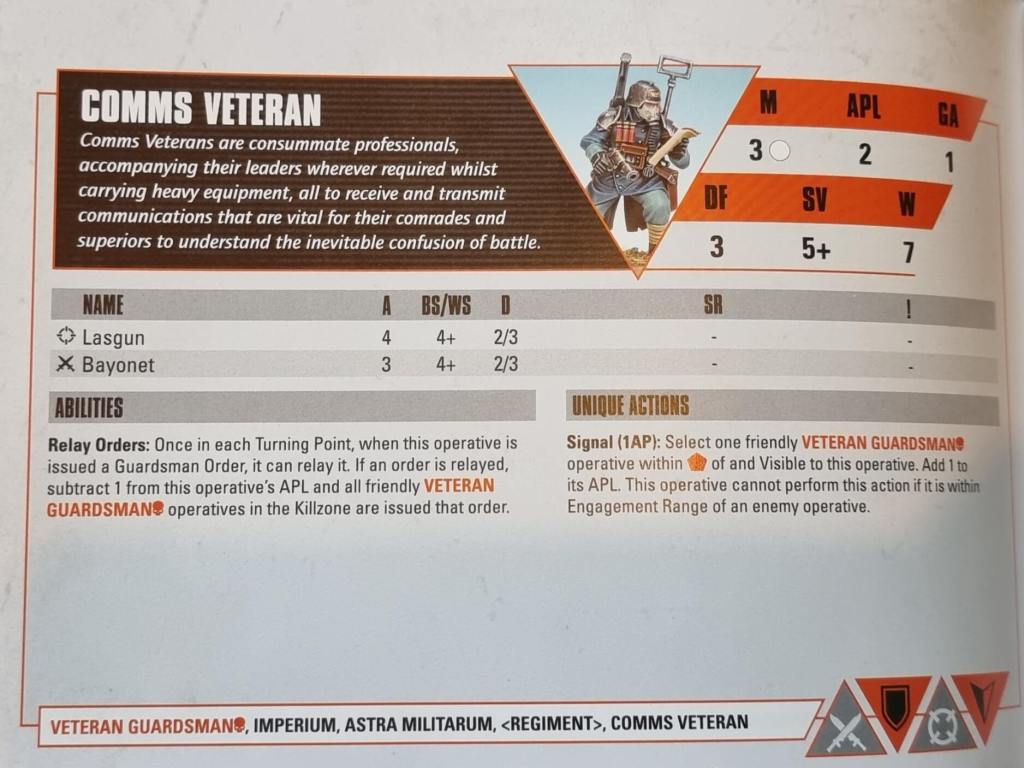
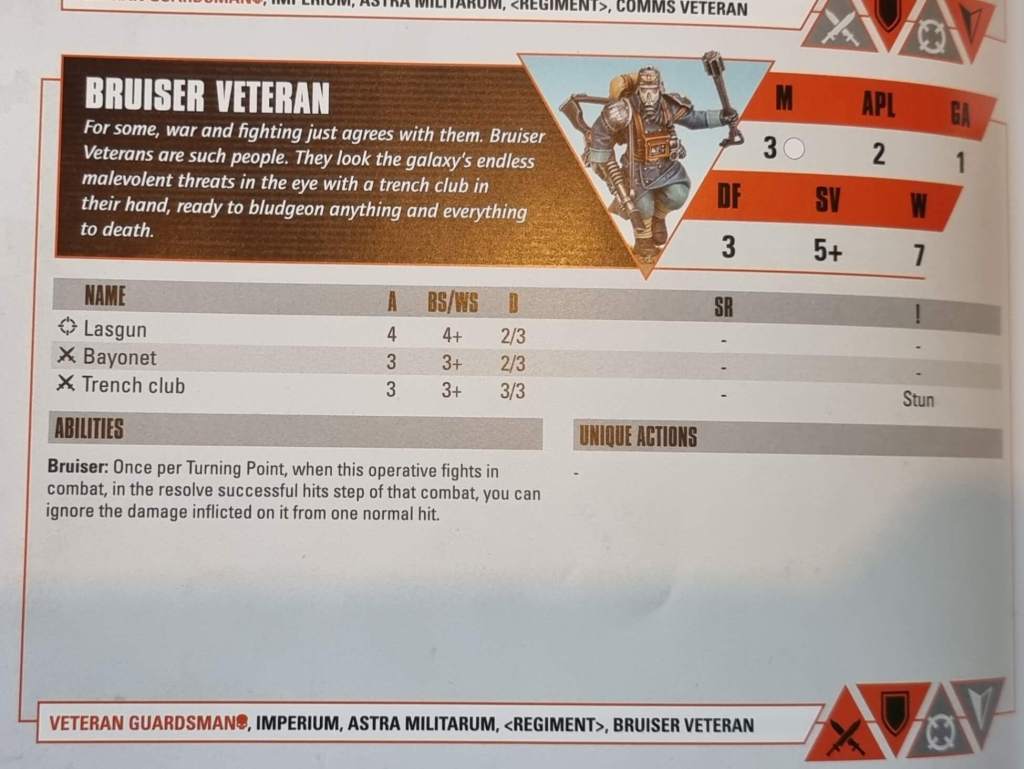
Firstly their archetype is security, which is a little limiting as they only have a single archetype to choose from for Tac Ops. For the kill team, it is basically a single fire team consisting of 10 Veteran Guardsmen and 1 Ancillary Support option. Your 10 Veteran Guardsmen consist of a Sergeant and then 9 other Veteran Guardsmen from the following list: a Trooper, Confidant, Zealot, Medic, Comms, Demolition, Bruiser, Hardened Veteran, Sniper, Spotter, and then Gunners with either a grenade launcher, meltagun, plasma gun and flamer.
There is a lot and you can select up to 9 normal Troopers and each other operative can be selected a maximum of once. The powerful thing here is that you have 4 different gunners, however, you are limited by what you can build with the kit. You do get the ability to build each operative but a lot of them share parts and poses which limit your ability to work with a single kit slightly. So for example, the gunners basically take up the same spures.
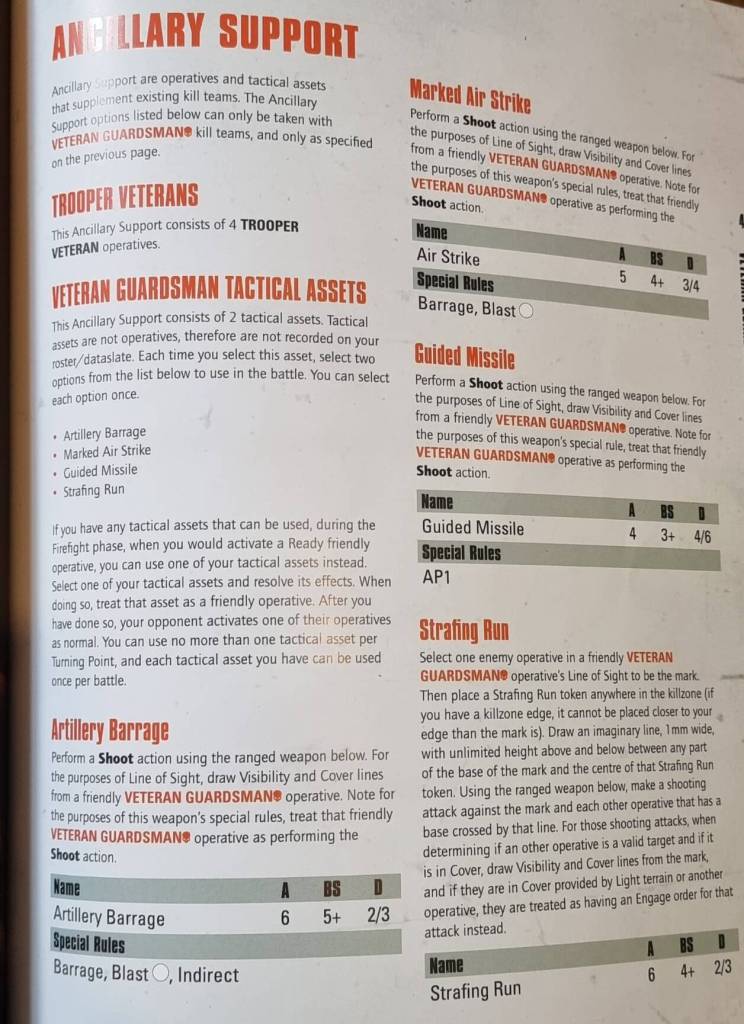
The Ancillary Support Option is a bit confusing. I believe you get both aspects of it but the wording is not entirely clear. This is because the option consists of 2 parts. The first part provides 4 additional Trooper Veteran operatives. The second part gives you access to 4 tactical assets. These are basically 4 different kinds of called-in attacks from: an Artillery Barrage, Marked Air Strike, Guided Missile and Strafing Run. From the 2 selected per game, you can only use each one once per game and not during the same Turning Point.
The reason I feel it might be a choice between both options (either the 4 Veteran Troopers or 2 Tactical Assets) is because the Tactical Assets are pretty strong and you only get 10 Troopers so would need to find another way to get 4 extra models. Either way, both are good options and the Tactical Assets provide more extra punch to the kill team.
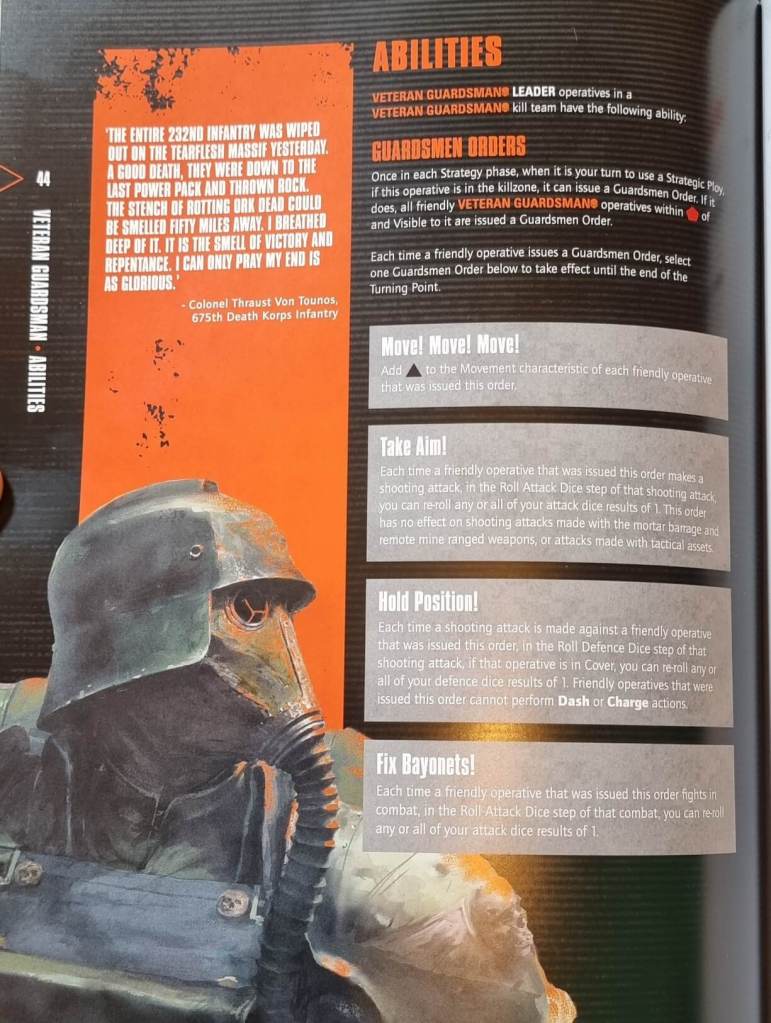
For additional rules, the Death Korps of Krieg kill team has the ability to issue 4 different orders during the Strategy Phase for free from your leader to every friendly operative within pentagon (6”) of him. These orders are: Move! Move! Move!, Take Aim!, Hold Position! and Fix Bayonets! The kill team also has a selection of strategic ploys and tactical ploys for even more tactical power at the cost of CP.


You also get an equipment page, as you get 10 points for equipment as per the matched play and narrative play mission sequences. These are all a variety of thematic faction equipment from hot-shot capacitor packs, SHOVELS, grenades and so on.

Finally there are 5 pages dedicated for Spec Ops play from battle honours, equipment and missions. Everything you need to play a narrative campaign with the kill team and a subtle guide for doing so at the same time.
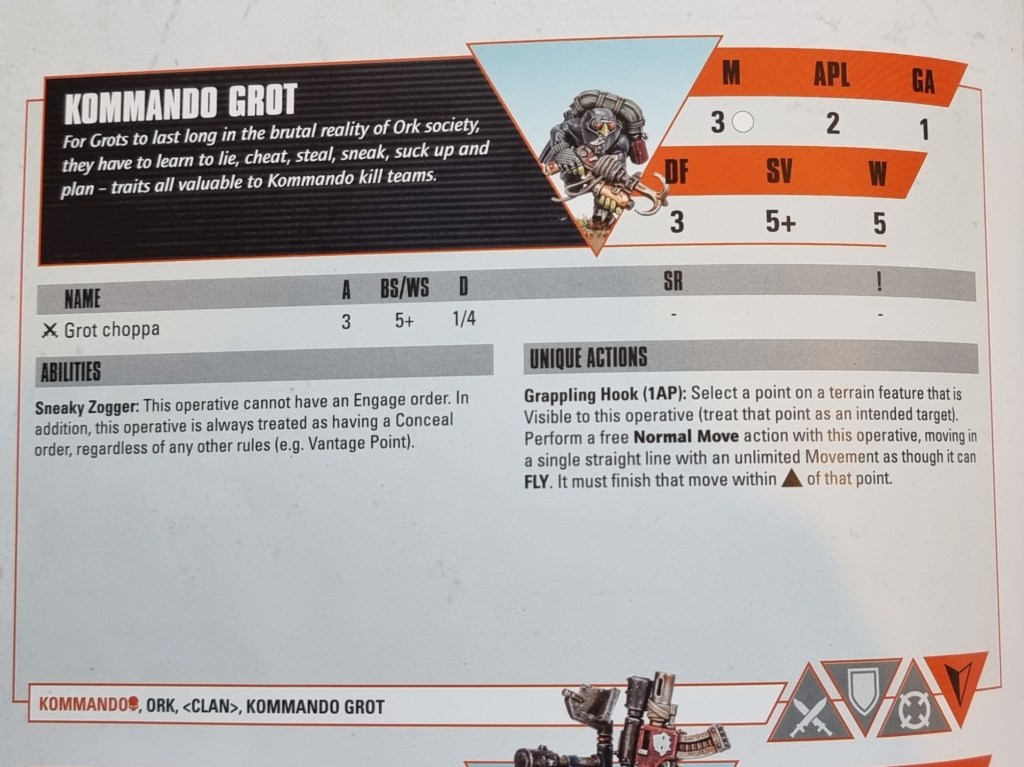
Here are the Veteran Guardsmen datacards:


Overall the Death Korps of Krieg kill team looks fragile but requires synergy to play well. Individually the kill team falls apart but when operatives are used to support each other, such as the Spotter with the Sniper, you can do very power combinations that the opponent will struggle to deal with. The Krieg fighters are packed with tons of individual special rules which can slow things down for new players but it does provide tactical players with lots of tools at their disposal. The kill team still can get overrun if overextended and rushed early, but with controlled and steady supportive play, they end up as a very strong kill team.
Ork Kommandos
The Kommando kill team has a similar layout to the Death Korps of Krieg kill team.
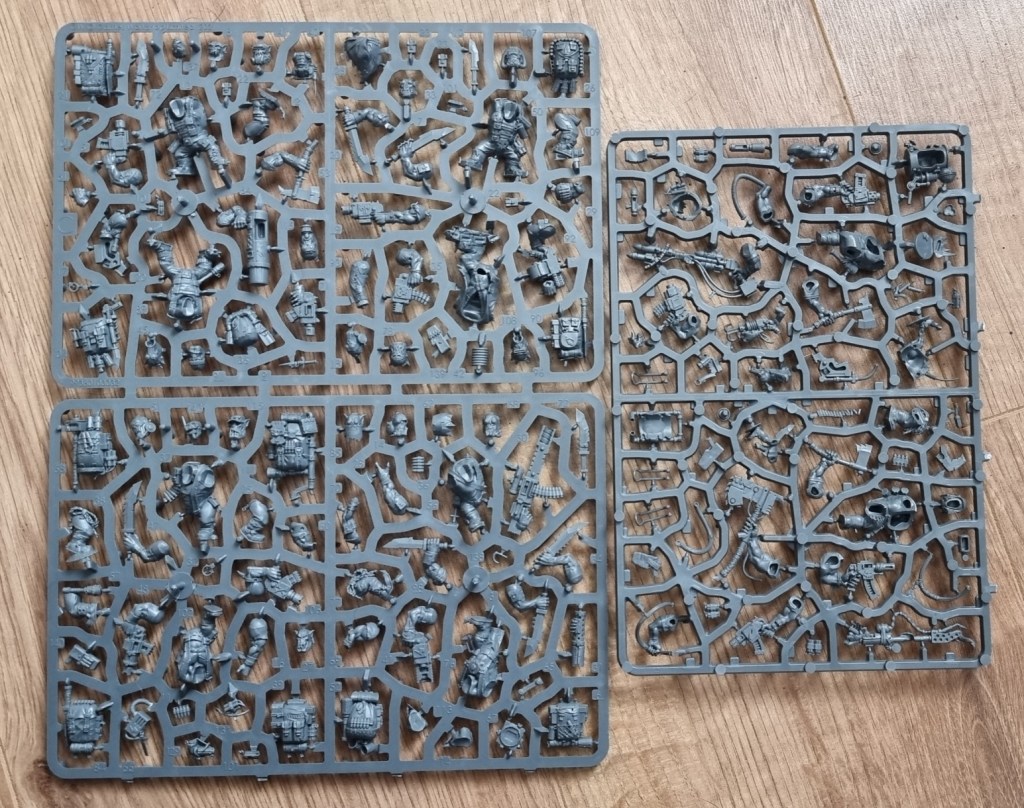
Once again the sprues are packed with detail. The biggest problem is that all the parts are scattered randomly around the sprues. What this means is stuff like a pair of legs is on one sprue, then its leg or neck or head is on a completely different part of the sprue. Nothing is placed near each other in anything that make sense so construction becomes a long and annoying process. The models, when you have all the specific parts together, are straightforward builds with lots of options. Heads are even interchangeable depending on the body. Lots of amazing thematic detail. I just wish they were organised better on the sprue.
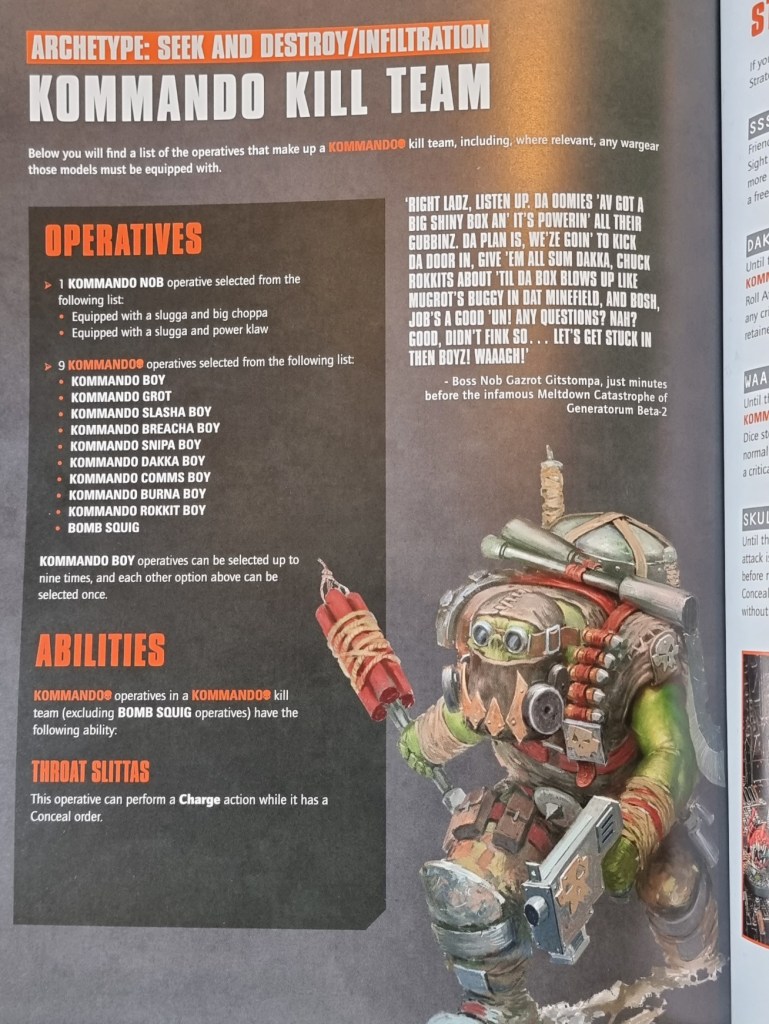
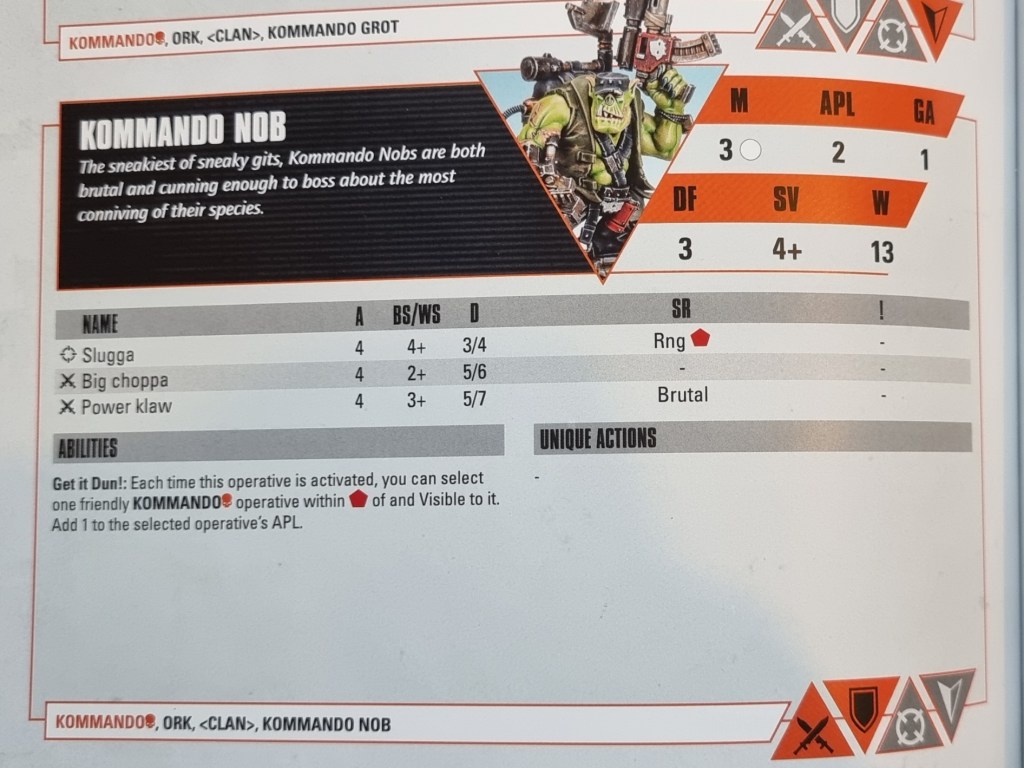
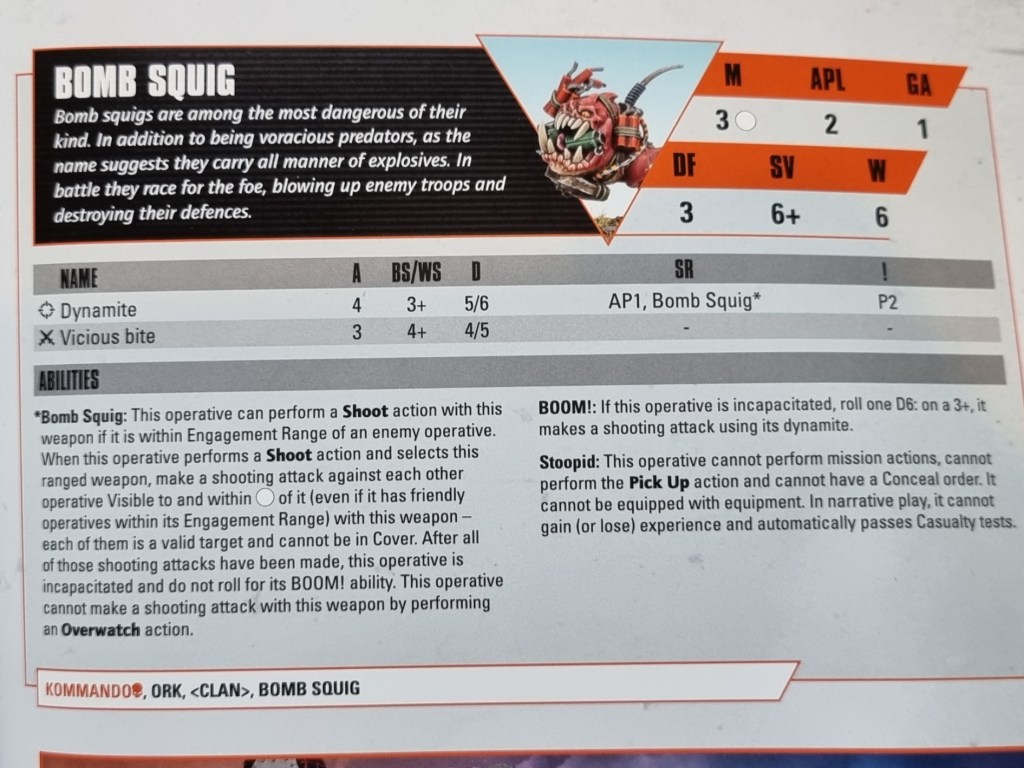
The Kommando kill team has the archetypes of Seek and Destroy as well as Infiltration so you have quite some choice when it comes to Tac Ops selection. A kill team consists of a Nob then 9 other Kommando operatives consisting of: a Boy, Grot, Slasha Boy, Breacha Boy, Snipa Boy, Dakka Boy, Comms Boy, Burna Boy, Rokkit Boy and a Bomb Squig. As before, each operative can only be selected once whereas the Kommando Boy can be selected up to 9 times. Note you get 12 models in this Kill Team and so all the operatives won’t be usable at once in a normal game.
The Kommando kill team has a special ability which is Throat Slittas. This allows all operatives (except the Bomb Squig) to perform a charge action while under the conceal order. This is hugely powerful as it allows your melee fighters to effectively move up the battlefield while unable to be shot at and then do sneaky charges. Thematic but a bit too strong in practice.

Like with the Krieg kill team you get a selection of powerful strategic and tactical ploys. Special note has to go to Skulk About here as it lets Kommando operatives with the conceal order retain a save dice without rolling, which stacks with cover and even works while in the open! Just so strong.


You also get an equipment page too such as Choppas for all your operatives with no melee weapons and then another large selection of narrative Spec Ops rules for your disposal.
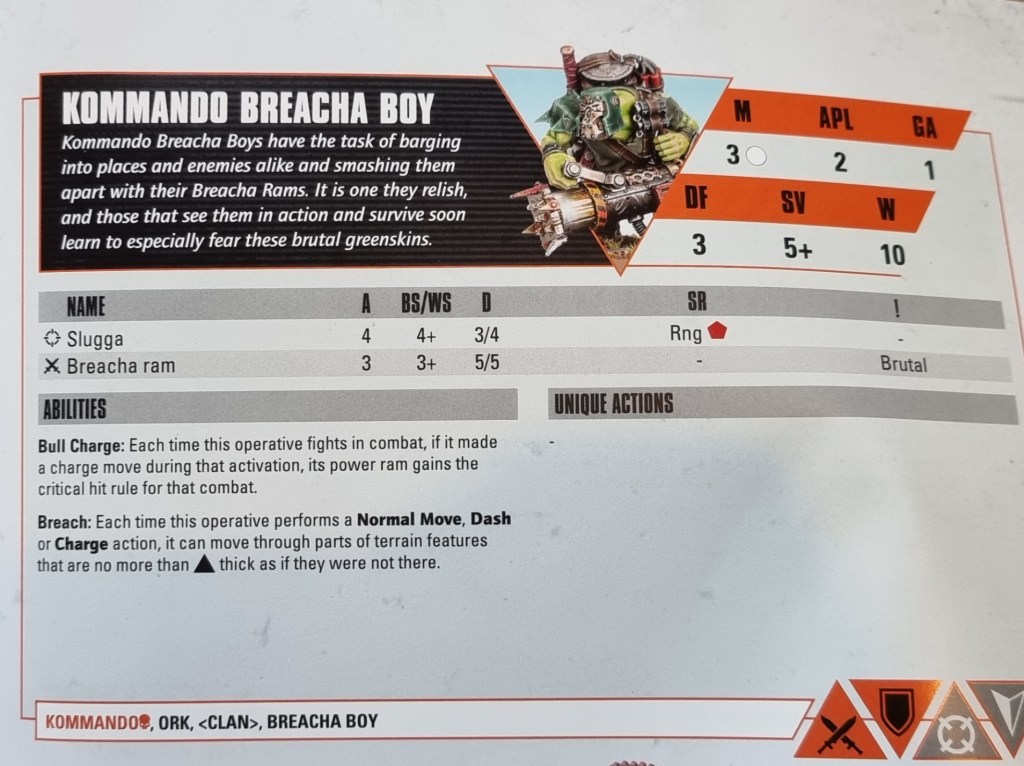
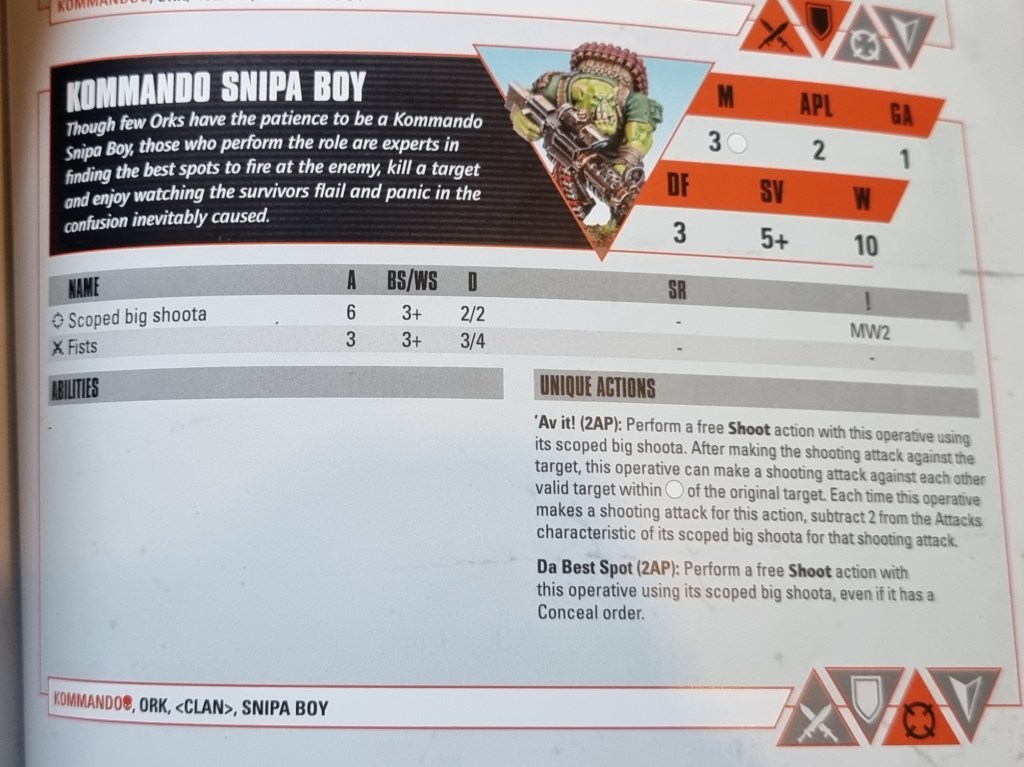
Here are the Kommando kill team datacards:


In conclusion, the Kommando kill team is very powerful. Strong raw melee stats, the ability to charge while under the conceal order, very strong ranged fighters and powerful ploys make this kill team exceedingly strong. The fact that most of their shooting attacks hit on 4s or 3s with potential re-rolls and high dice output makes them super dangerous to face. Even the standard Kommando Boy can dice apart most foes when rolling well. They feel slightly too strong with all the choice and rules they have access to but are still fairly balanced when facing off against the Kriegers.
Kill Team Octarius Overview

The Kill Team Octarius Box is another Games Workshop product packed with a ton of value from rules to plastic sprues. It is a complete way to play Warhammer 40,000 Kill Team along with being a great introduction to a new edition of the game. While a bit daunting to get into at first, it gets a lot easier after a game or two.
Pros:
- Packed with content from rule books to sprues and dice
- You get 2 highly detailed kill teams which can be easily used in normal games of Warhammer 40,000
- Enough detailed and easy to build terrain kits which provide you with a solid terrain selection for your Kill Team games
- Everything you need to play is included in the box
- Measurements being simplified to specific ranges does allow for faster gameplay along with the unlimited range on most weapons
- The simplified rules are still complex enough to allow for competitive games
- Terrain rules are clear and concise while still having lots of depth
- Amazing narrative content with simple yet deep rules for narrative play and campaigns
- Matched play is still fairly balanced and streamlined, even with the removal of points
- Close combat is brutal and fast
- CRITS
Cons:
- The shapes take a bit of time to get used to and still don’t make sense based on the range bracket they are supposed to represent
- While the included kill teams are powerful, they are a bit daunting to play for new players due to the volumes of rules packed within each kill team
- Lack of rules for other kill teams
- No external cards for operatives and rules
- Crits, while amazing to see, aren’t implemented well and feel a bit odd to defend with in certain situations
Surprisingly, I don’t have too many cons and I thought I would have more myself! The biggest issues are the uncertainty of cost and the lack of rules for other kill teams which have been separated into the Kill Team Compendium book. It’s a bit sad to see considering those rules were included within the last Kill Team core book.
Complexity is still an issue but after some games, everything makes sense and flows really well. The new Kill Team game makes much more sense when you’ve played the rules in practice, snippets of the rules are confusing until you see the full picture. The Death Korps of Krieg and Ork Kommando kill teams are really amazing kits but do add to the rules difficulty for new players. They feel a lot better with practice but don’t be surprised if your first game takes a while as you track rules and abilities.
One other thing I would have liked are external datacards for operatives and special rules too. Having those outside of the book would really help speed up gameplay instead of having to keep flicking back to the Octarius Book. It just breaks the gameplay flow and there’s a bit too much to remember without referencing the book.
Overall, the Kill Team Octarius box is a great product. While I still lack the knowledge on price, I highly recommend buying it if you’re interested in Kill Team. It’s a great way to start the game with and is packed with lots of content no matter your appeal from narrative gamers to tournament players. Even without points, the roster selection allows for a lot of tactical selection while remaining balanced.
If you want to buy the Kill Team Octarius box, you can do so via my affiliate link to Element Games here when it goes up for pre-order. Remember you get a 15% to 25% discount while at no additional cost to yourself and helping to support the channel.
Closing Crit

So there you have it, my take on the new Warhammer 40,000 Kill Team Octarius box and its contents. I really like it and I think you will to. Kill Team does look daunting on paper, but it really does all click together when you play.
Remember, even in the grim darkness of the far future there are only 2 constants: shapes that don’t match the numbers they area assigned to and CRITS!

What a terrible decision to use those range symbols. I wonder what they couldn’t do by using normal numbers (both on data sheets and on the rulers) that they feel they CAN do by using these confusing symbols, that don’t make sense either (I mean, they could have at least used symbols that have the number of sides that they represent). This feels gimmicky without any benefit.
Oh, and for the price of this box they could have included separate data cards for the units in the box, so I don’t have to spread out my book to photocopy them…
LikeLike
Thank you for these easy to download data cards.
LikeLike