
Going over my tips for setting up Kill Team game boards!
- Key Points for Terrain
- Octarius Layouts 1.0
- Octarius Layouts 2.0
- Bheta-Decima Scatter Terrain Map Pack
- WTC Kill Team Terrain Pack
- Terrain Guide and Map Layouts Overview
Welcome to today’s Warhammer 40,000 Kill Team article where I update my terrain guide based on the Critcal Operations update! I cover how to setup boards, example terrain, keeping dropzones safe as well as 3 example terrain layouts you can use for your own games!
I’ve also done this as a more in-depth video on YouTube which you can watch here:
Key Points for Terrain
I’ll cover these briefly but when designing boards for Kill Team, here’s what I always follow:
- Place objectives first, so you can set terrain around them (just like in the core rules).
- Keep dropzones safe, ideally 1 to 2 pieces of heavy terrain in the dropzone so players don’t get blown up TP1. If you only go with 1 heavy piece, use a 2nd piece further forwards to obscure a dropzone.
- Use heavy terrain in the middle of the board, either a large block or long L/U-shaped terrain piece to prevent people shooting each other easily from their dropzones.
- Leave Tac Ops scorable, namely Secure Vantage and Central Control. Don’t place all vantage points within blue of dropzones and don’t entirely block off the center of the table with a large heavy terrain piece so Central Control is still scorable.
- Don’t place vantage points in dropzones. You can place them on the edge of dropzones but ideally with the side that has no cover on top facing the opponent to make it fairer or placing the vantage point more than blue from the dropzone so players cannot Recon dash onto them in the scouting phase.
I cover it more in my video but those are my basic tips.
Octarius Layouts 1.0
Now I’ll go over 3 terrain layouts I’ve designed for both tournament and casual play. They use a single set of Octarius terrain as it’s the most common set of terrain everyone generally has access too. Also I’ve designed these maps with 2 vantage points blocked off (big red X), meaning the roofs still exist but you cannot climb over/through or place on them (or phase through with fly). You can play the maps with all 4 vantage points on but then it does kinda break the balance of the board.
Each layout also has their own unique things I’ve designed to hinder movement. These are optional but will be mentioned for each map. I also don’t play these maps with doors on but they work completely fine with doors in-use. That’s up to player choice at the end of the day.
I’ve also done 3 layouts, 1 for each of the 3 new Critical Operations layouts. These maps are also designed so that they are easy to alternate between if you want to change maps every round as a TO. For this, the maps are designed that going from horizontal to diagonal, and then diagonal to vertical, only takes about 1 to 2 minutes.
Note: thanks to Dankboss for helping with the TTS layout designs.
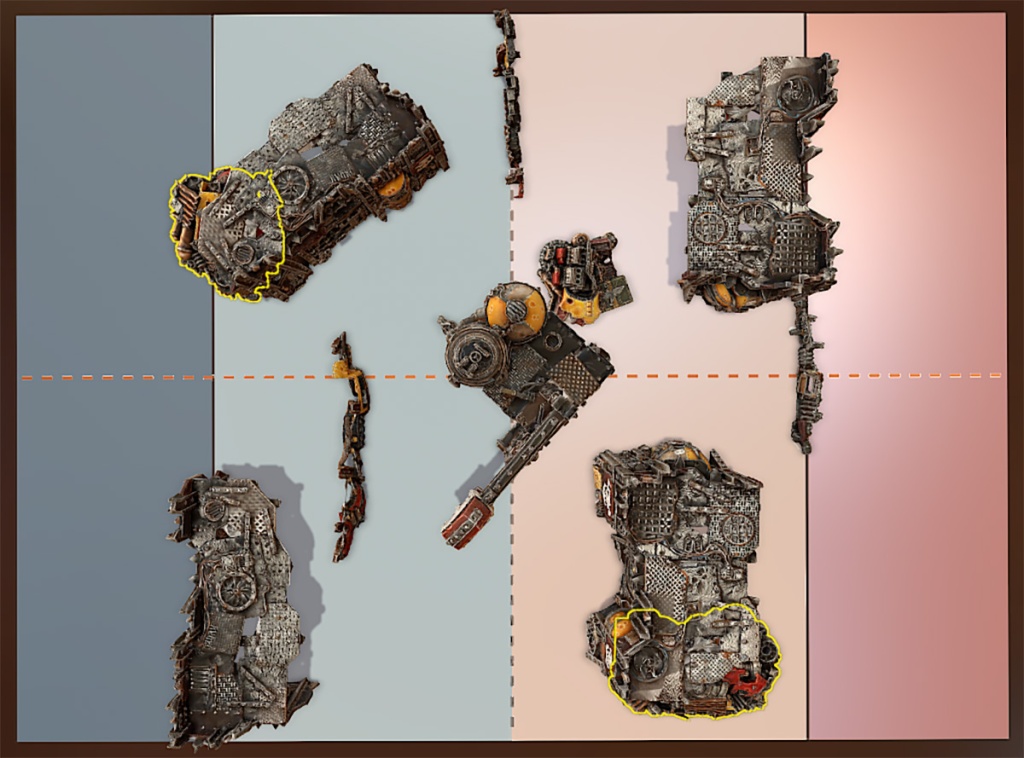
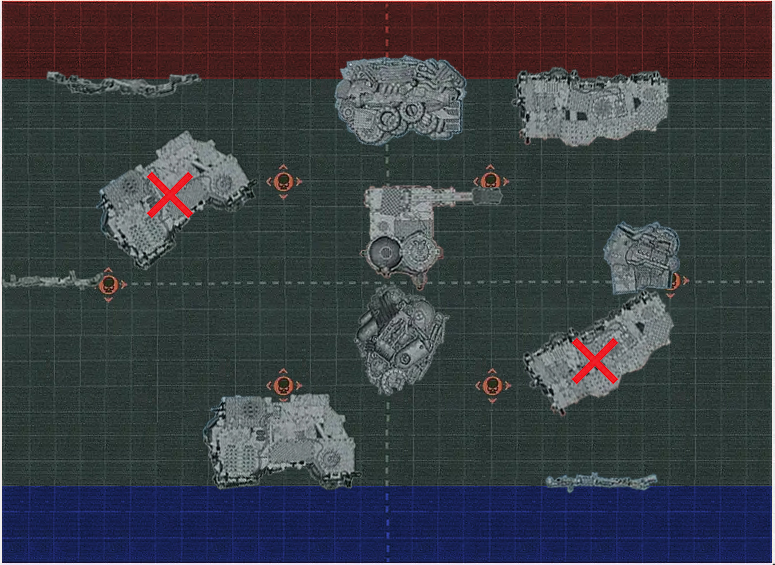
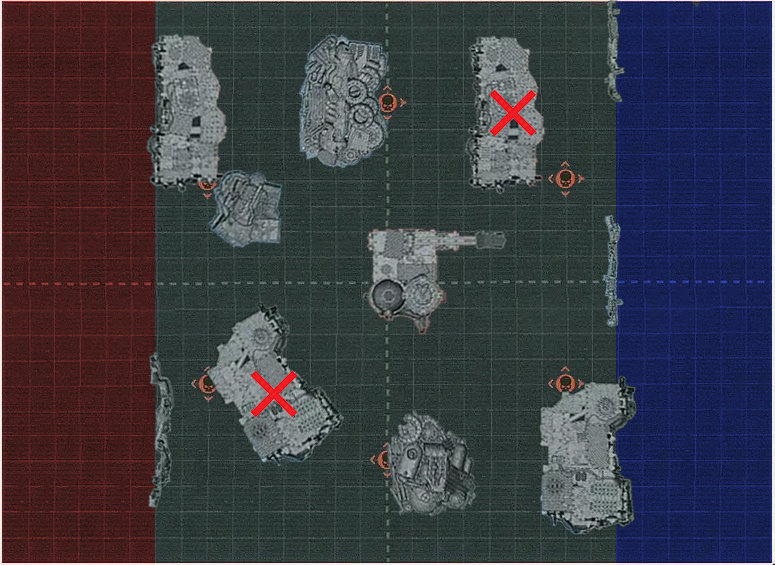
Horizontal (Hamburger) Deployment
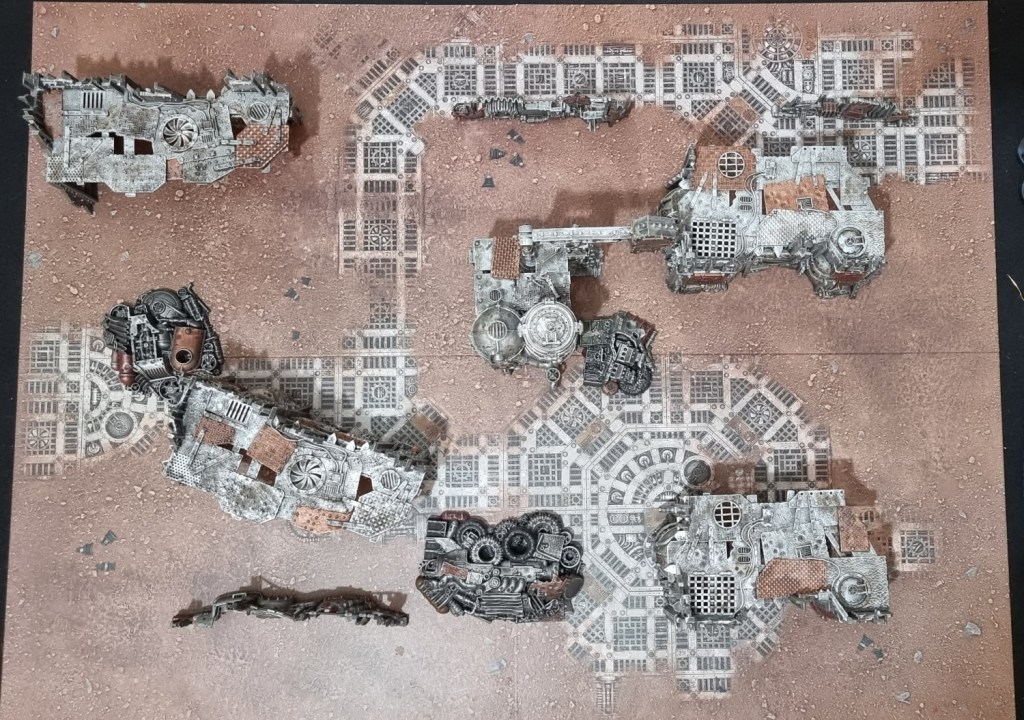
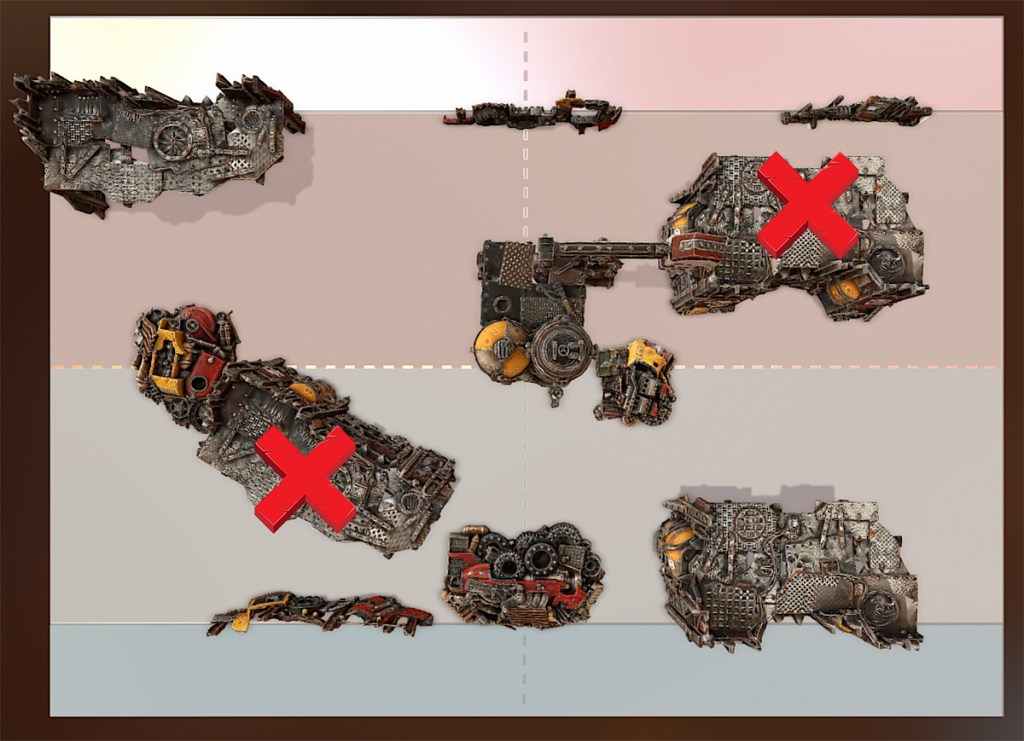
The unique quirks with this layout are as follows:
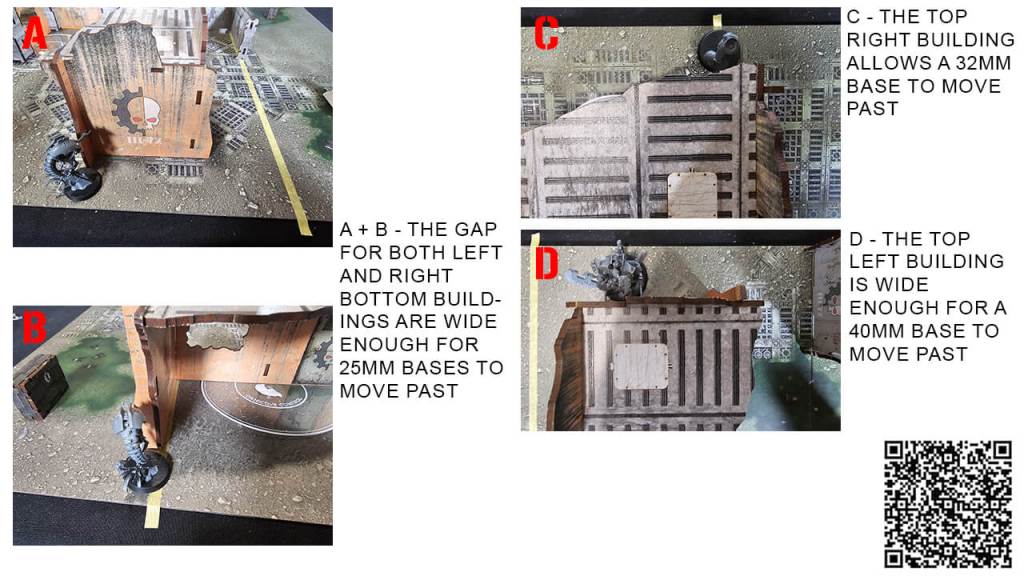
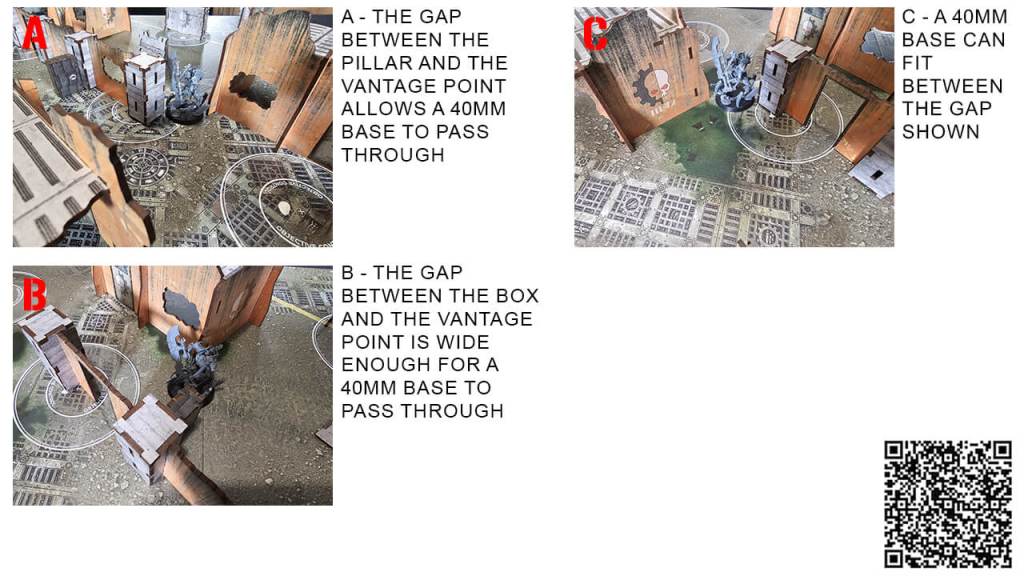
- The bottom left building has a gap that allows a 32mm base through between itself and the large scrap pile.
- The top right building has a 28mm gap between it and the small central scrap pile
- The top left vantage point is just over 1 inch from the board edge, meaning only a 25mm base can walk around it.
- You should only be able to get a shot from the top left vantage point into the dropzone opposite if you are in the bottom left corner of that vantage point AND if there is an operative on the left side edge of the light wall barricade in the dropzone.
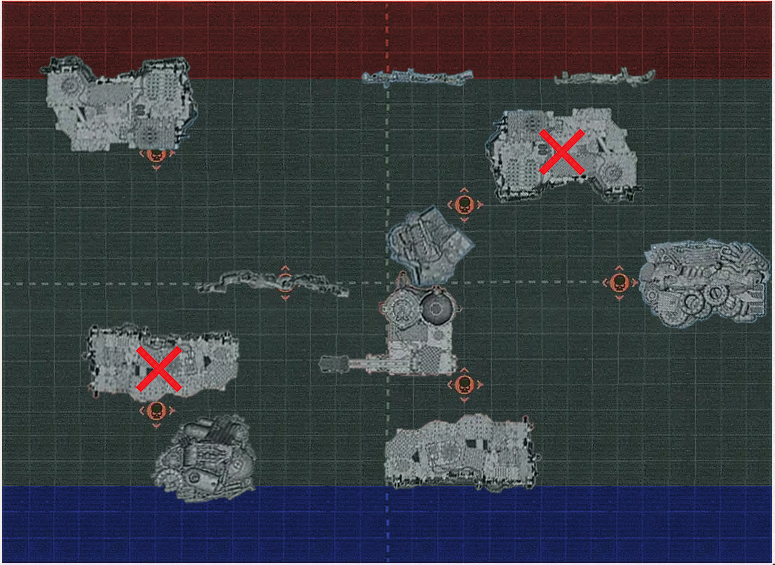
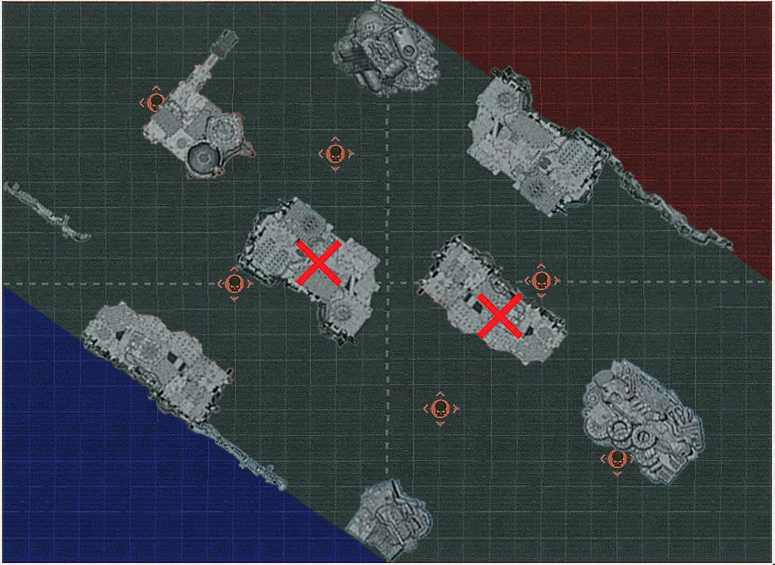
Diagonal (Quesadilla) Deployment
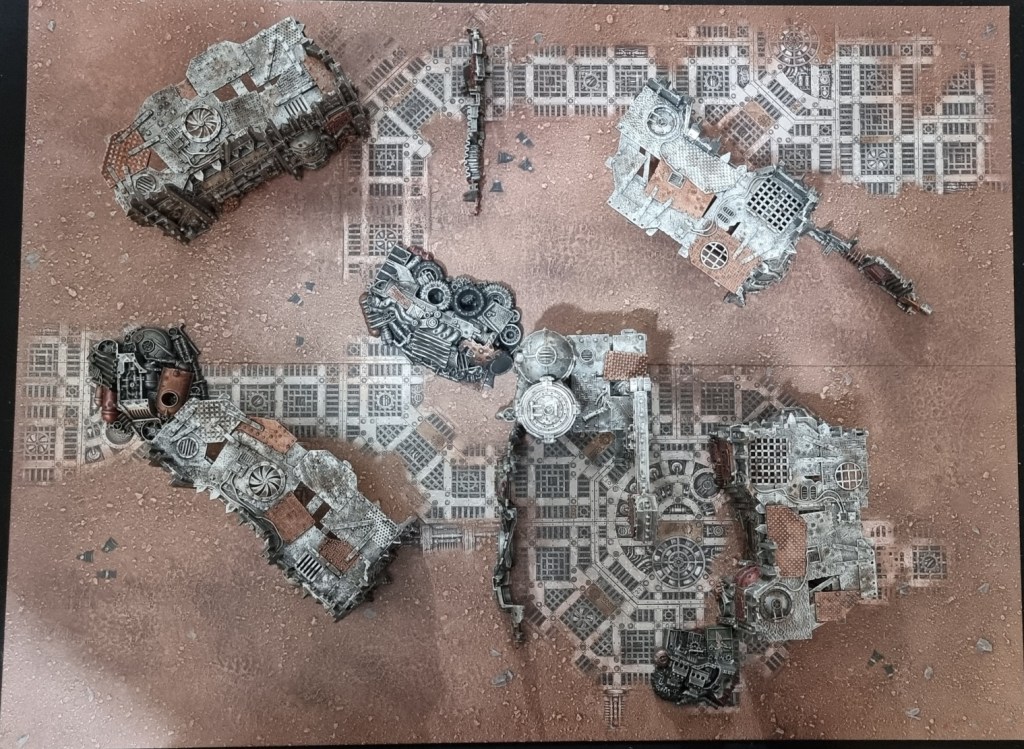
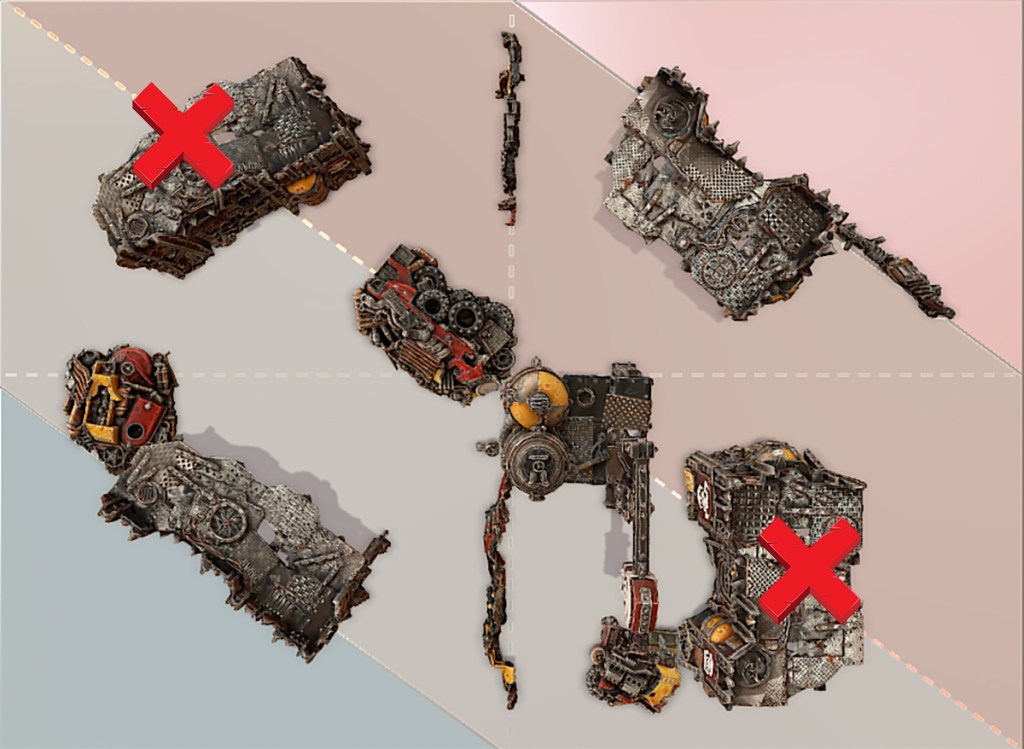
The unique quirks with this layout are as follows:
- The bottom right small scrap pile has a gap of 1 inch allowing a 25mm base to walk around it freely
- The gap between the board edge and the central light wall is 1 inch so 25mm bases can walk around it freely.
- The gap between the bottom right building and the central oil rig allows a 32mm base or smaller to move around it freely.
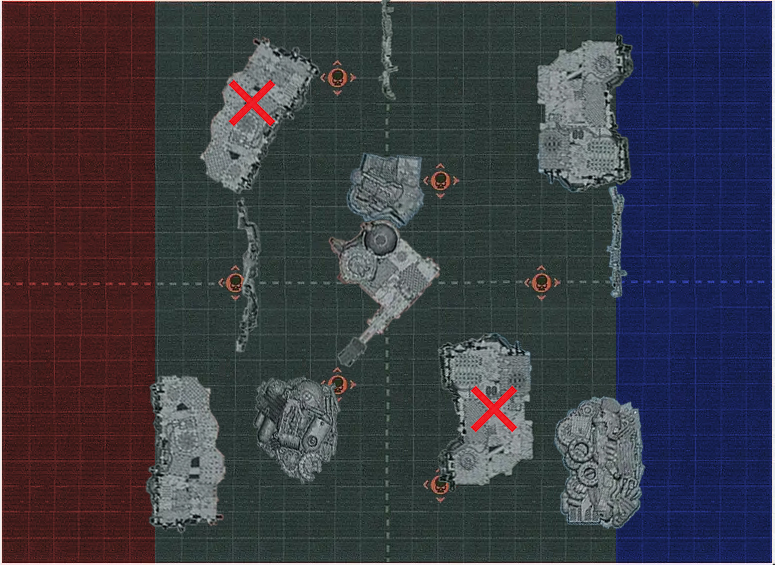
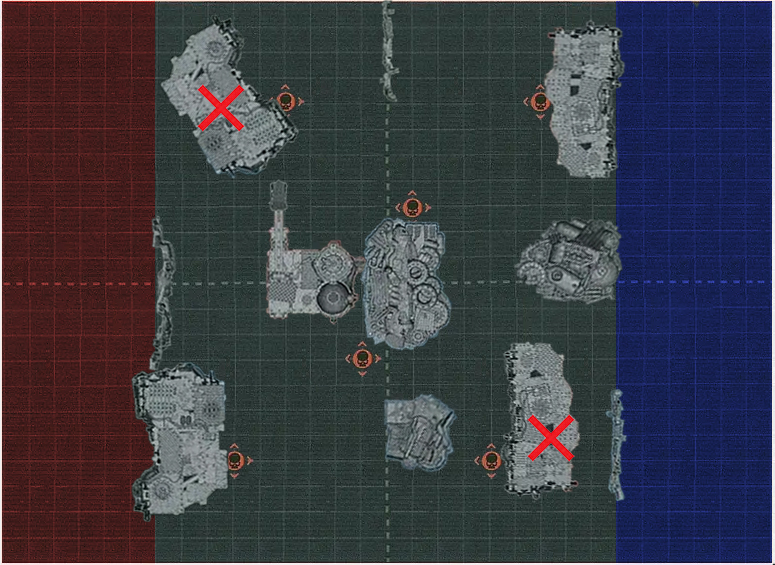
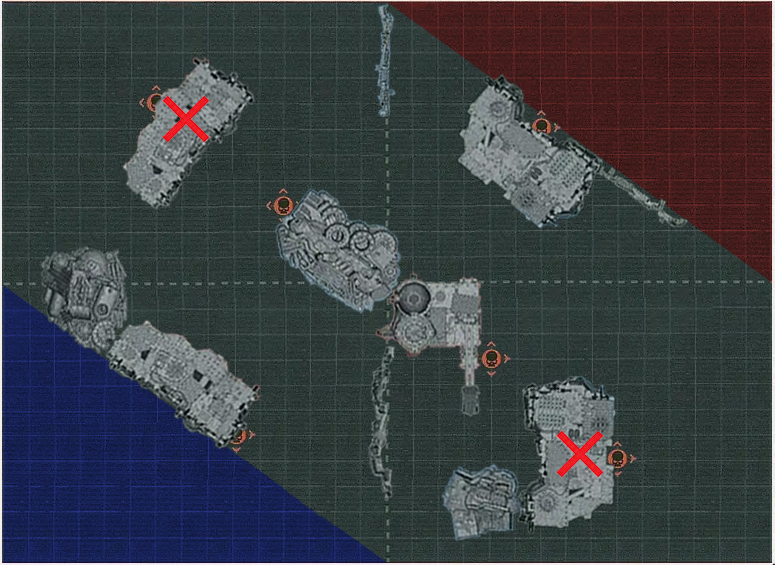
Vertical (Hotdog) Deployment
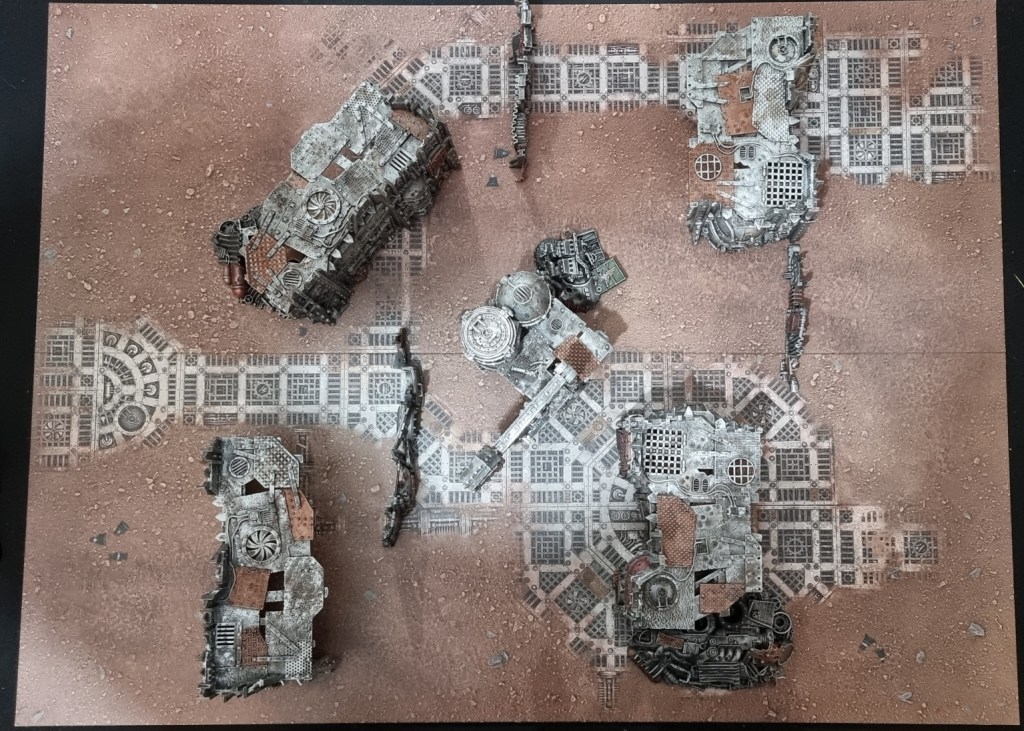

For this deployment, I’ve got a 3rd image to highlight the exact placement of the scrap piles.
The unique quirks with this layout are as follows:
- The bottom left vantage point and bottom right large scrap pile are 1 inch from the board edge so a 25mm base can walk around freely
- The scrap piles are placed in such a way that you cannot scramble and use the doors at the same time due to the latest FAQ but also to hinder door use in a way if you are using them.
- The gaps between the small central scrap pile and the central light wall as well as the corner of the top right building is enough of a gap so that 40mm bases cannot move through.
Octarius Layouts 2.0
As per popular request I have now done 9 new maps for the Octarius kill zone with the 9 Crit Ops missions! The above video goes into each map more, but I’ll have the PDF and images of the maps here. I’ll be updating them based on feedback and thanks to my Patrons and Discord users I’m already on version 2.1! I’ll post the latest version if/when I update the pack.
Once again this maps are inspired by the Warhammer World layouts. X means no vantage point. You can either remove the floors on those Octarius buildings if they’re not glued in or just leave them as is. Doors are designed in-mind with being off but the maps work still if they’re played as being on. You only need a full Octarius set for these maps, nothing less or more.
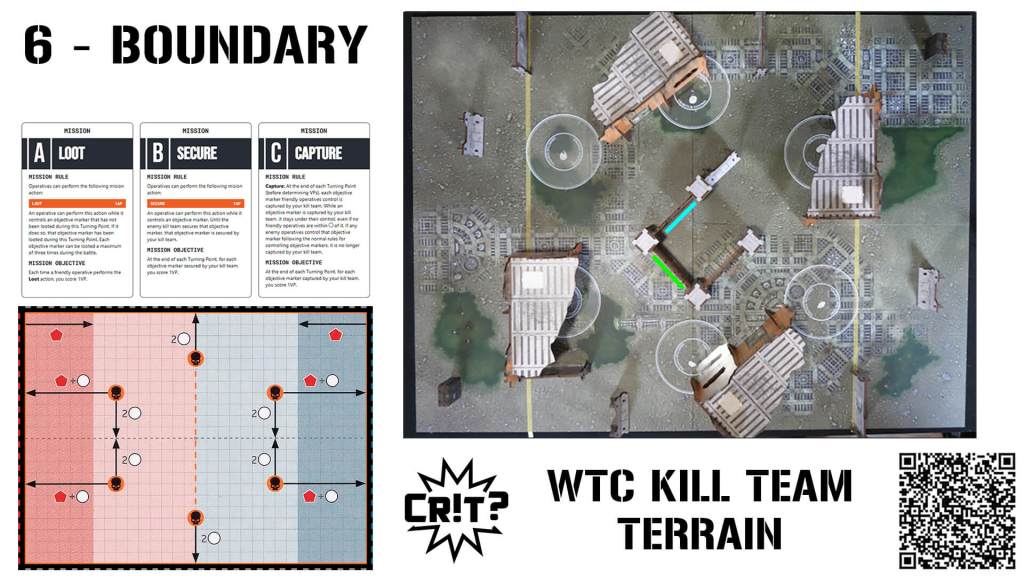
Horizontal (Hamburger) Maps
All 3 of these layouts are designed with 4 objectives being “safe” and 2 being contestable by vantage points.
Verticle (Hotdog) Maps
The same applies here although with more staging points on the mid-board for opposing players to push from in later turning points.
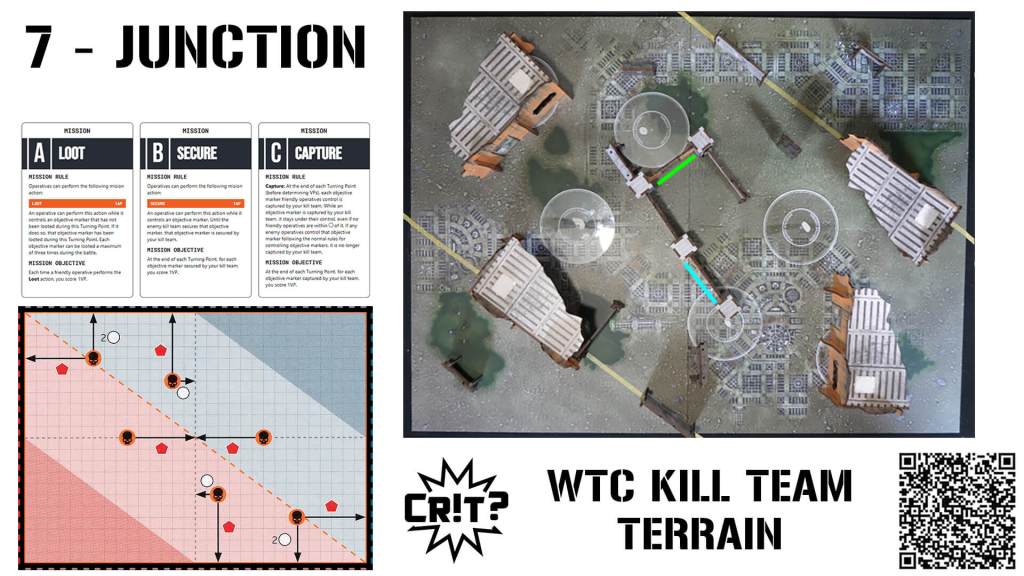
Diagonal (Quesadilla) Maps

These boards have the same principle but with slightly more difficult to reach corner objectives.
Bheta-Decima Scatter Terrain Map Pack
Direct Link: https://drive.google.com/file/d/1OKeOyAPwxZNfus8lCDSQDVQUZRmuo6_2/view?usp=drive_link

As per the recent Warhammer Community update for the Bheta-Decima killzone with Approved Ops, I have released my own map pack (inspired by Ryan from Turning Point Tactic’s map packs) using the GW one as a base with Salvation scatter terrain for your games. You can also use other proxy terrain instead if you wish (such as Into the Dark scatter terrain) as I have also provided the dimensions of the terrain needed. You can download it as a PDF or individual images at your leisure. The above video covers it all in-depth.

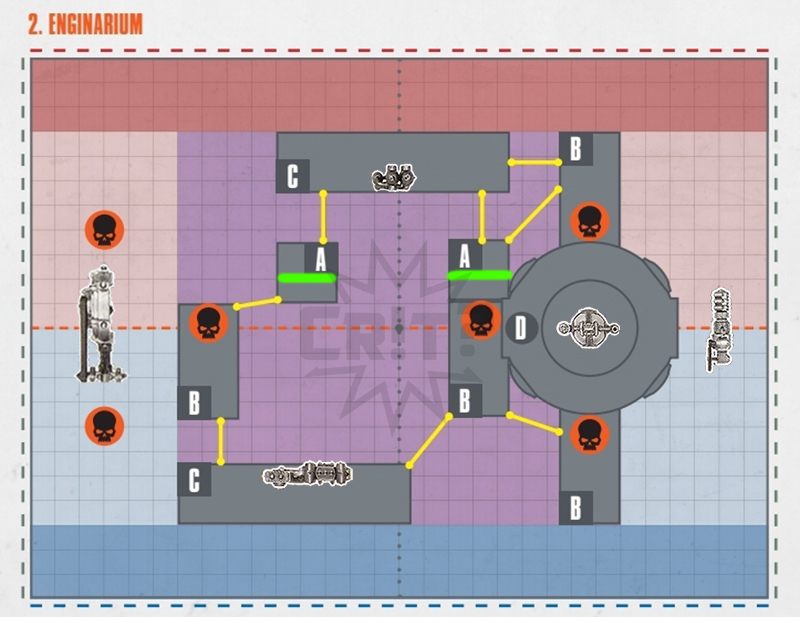
Layout 1 – As with all maps, green lines indicate the direction singular platforms should be aligned. The left and right heavy terrain pieces provide obscuring cover while just being out of range for providing cover from a recon dash.
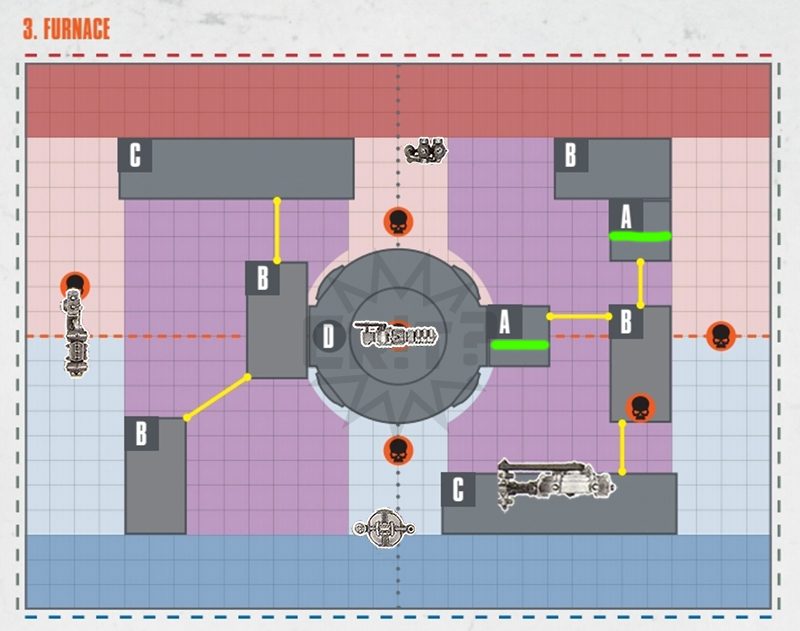
Layout 2 – There are even less scatter pieces providing cover on objectives here but both objectives on the B gantries next to the feratonic furnace can be covered by barricades or the furnace it self. The light cover on the right is there to provide a small staging point for assaults at the risk of being countered by the nearby gantries.
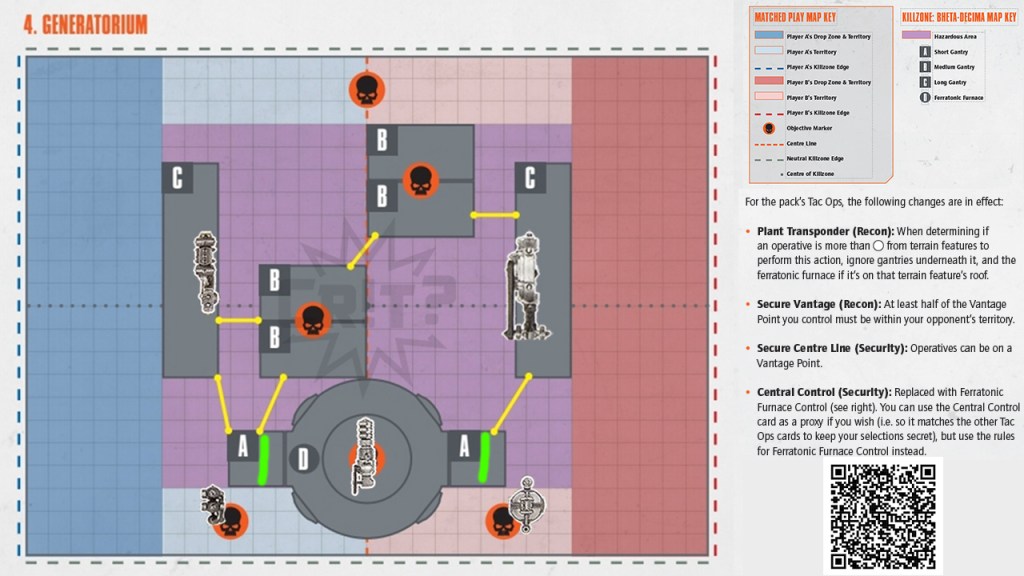
Layout 3 – The 2 small heavy scatter pieces provide safer staging points for deployment, although the blue dropzone will require 40mm and larger bases to traverse up to the center of the killzone. Left side has a closer piece of heavy cover for player red to offset the close objective on gantry B right of blue side.
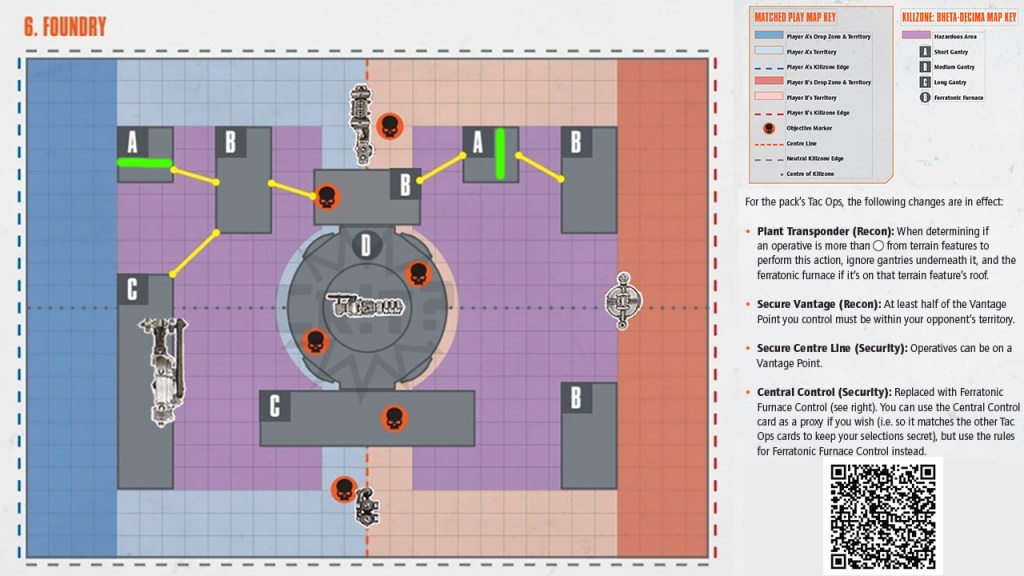
Layout 4 – Both B gantry objectives are exposed but coverable via barricades, although will be exposed to shooting from whoever controls the furnace. The smaller pieces of heavy provide defensive objective control at the cost of further board presence while both sides have heavy cover to hide behind for moving up on to drop zone gantries.
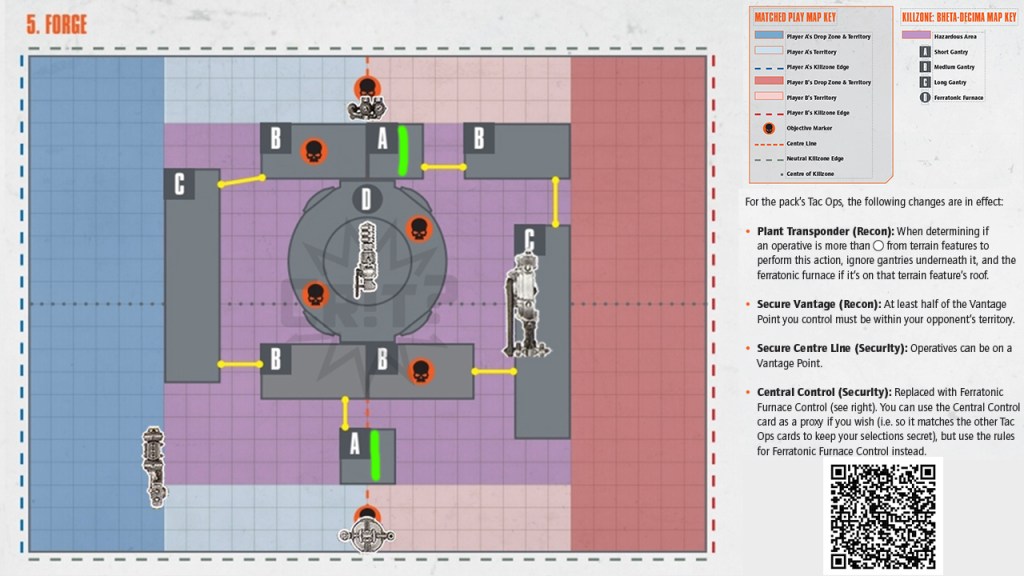
Layout 5 – The smaller gantries are setup to provide more LoS blocking cover, blue side has drop zone heavy terrain to make their deployment safer in parallel to red drop zone.
Layout 6 – A difficult map to work with but red now has a safer dropzone if they want to be deployed in the middle while both sides now have some usable heavy cover to provide staging points for storming the furnace.
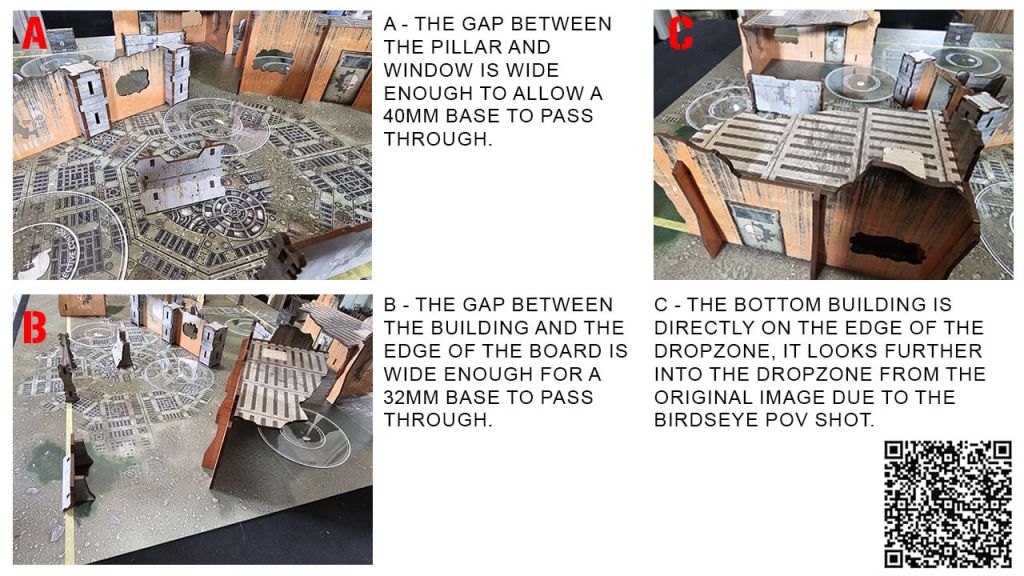
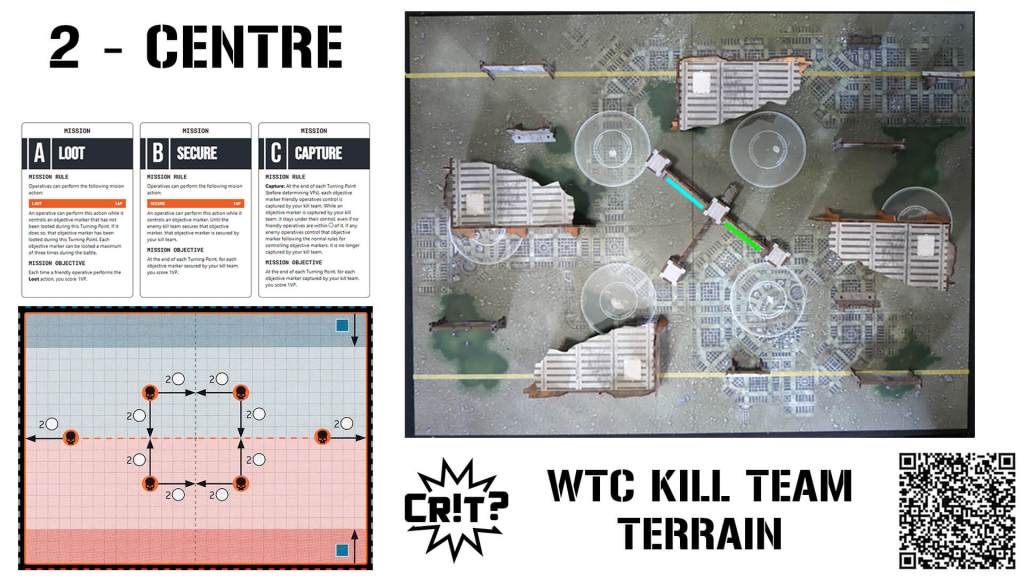
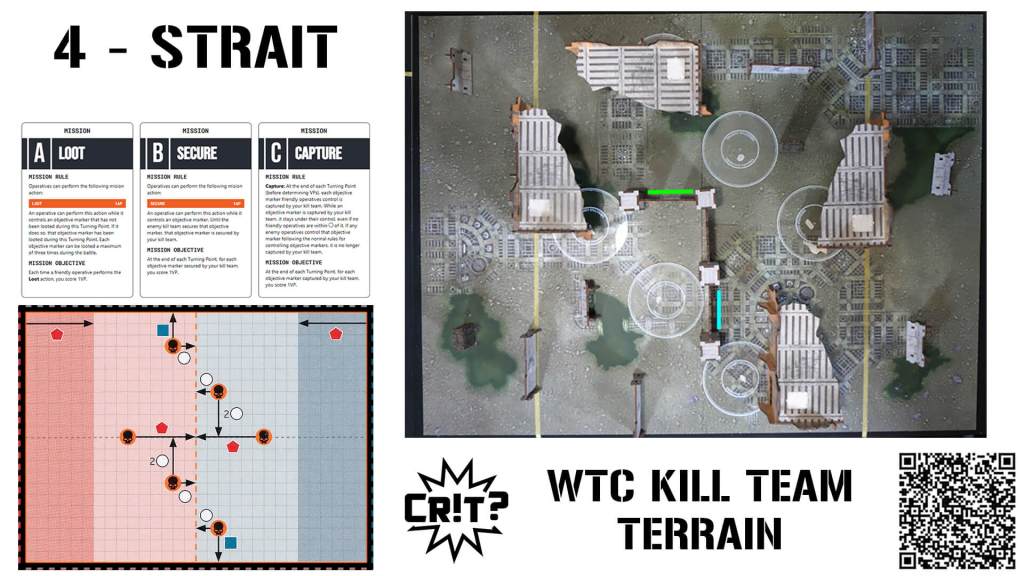
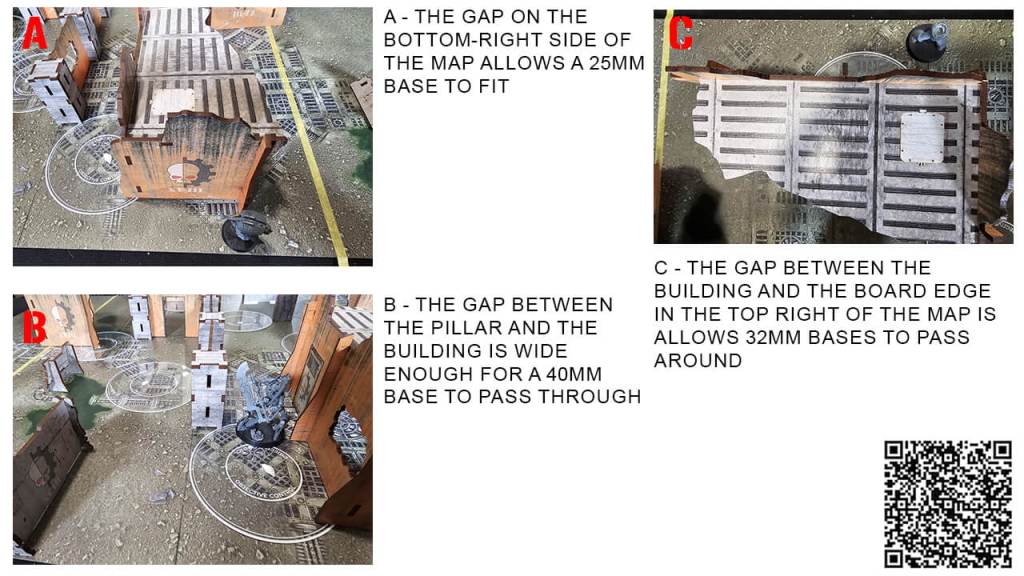
WTC Kill Team Terrain Pack
Direct Link: https://drive.google.com/file/d/1UyHKcWpa4yZTgGFSHKOl5rY371VzPgZU/view
Terrain Key
Layouts 1 to 3


Layouts 4 to 6


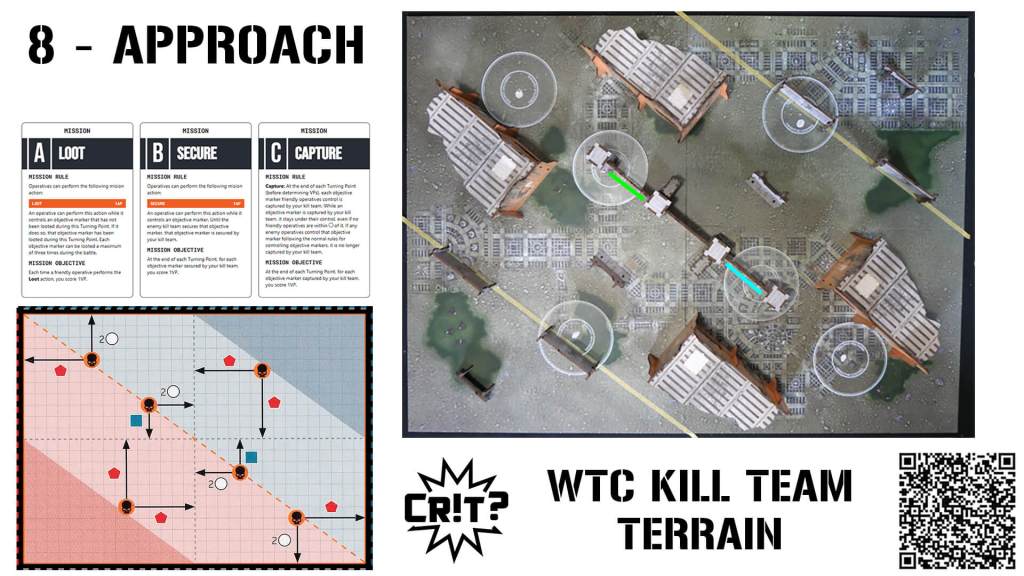
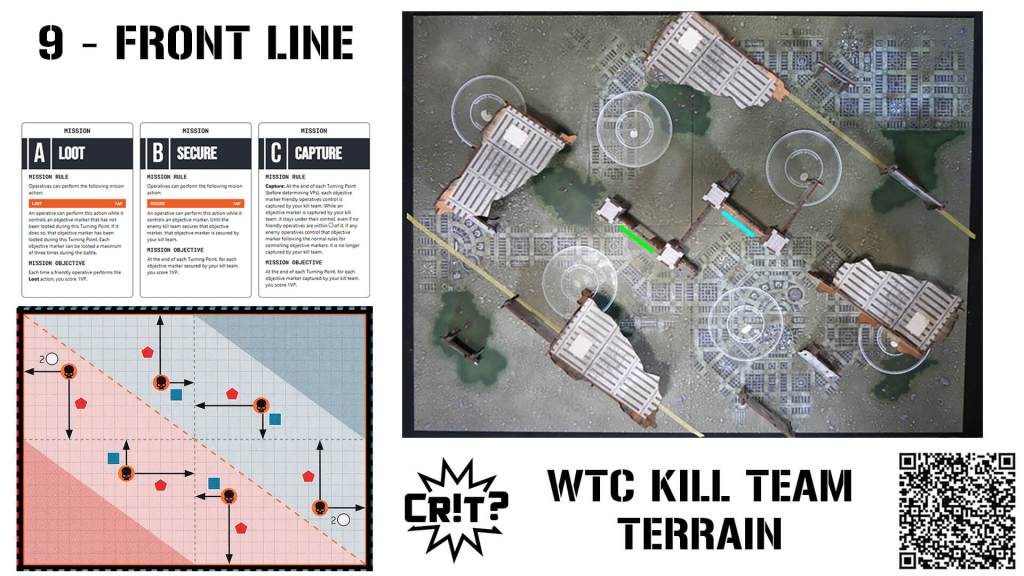
Layouts 7 to 9

Terrain Guide and Map Layouts Overview

So that’s pretty much it for today. I hope these tips and guide help you with your own terrain layouts. For the 3 maps I’ve provided, feel free to feedback! As I mentioned in the video, I may update these in the future based on feedback as well as maybe adding more terrain layouts in the future for boards like Nachmund and Moroch etc. Either way, the terrain layouts will be here to use for your own games or tournaments!
Before I go, feel free to check out my Discord as well as my Patreon if you want to give me some more support as well as my affiliate link at Element Games!
So remember, until next time, no matter what the tiers say, stay away from tier 15 and you’ll always be able to roll a crit!
